KUMA Timer — User Guide
Stage countdown timer for live events · macOS, Windows & Raspberry Pi
Installation
KUMA Timer ships as direct downloads only — no third-party storefront required. The macOS and Windows builds are code-signed, so Gatekeeper and SmartScreen will not flag them; the Linux and Raspberry Pi AppImage is unsigned, which is standard practice on desktop Linux.
Every install starts with a 30-day trial — every feature unlocked, no sign-up and no card. When the trial ends KUMA keeps running free in Lite mode: the core countdown, presets and runsheet cues (up to 10 of each, max 59:59), OSC and the Bitfocus Companion module.
A one-off £8 licence unlocks everything for good — longer timers, on-screen messages, NDI output, LTC, KUMA Live, the iOS Companion app, wireless displays, audio cues, QLab / Mitti follow, the Layout Editor, TCP / UDP show control and Raspberry Pi kiosk mode. One code covers macOS, Windows and Pi (one machine at a time); move it to another machine any time from the deregister portal. The full feature-by-feature breakdown is on the pricing page.
macOS
Signed & Apple-notarized .dmg. Open the disk image, drag KUMA Timer.app to Applications, launch. No Gatekeeper warning. First launch starts the 30-day trial automatically — no sign-up needed.
When the trial ends (or earlier, if you already have a code): Settings → License Info → Activate with key. Codes arrive by email from Stripe within seconds of checkout.
Windows
Signed via Azure Trusted Signing. Standard Windows installer .exe, runs without SmartScreen warnings. First launch starts the 30-day trial.
The same £8 licence code works on macOS, Windows and Raspberry Pi — one code, one machine at a time. Switch any time via the deregister portal.
Raspberry Pi (kiosk mode, one-liner)
KUMA runs as a dedicated kiosk appliance on Raspberry Pi: fullscreen timer on boot, zero desktop, controlled entirely from the web admin panel at http://<pi-ip>/.
Kiosk mode needs a licence (the web admin panel is a licensed feature). The same £8 code that activates your Mac or PC also activates the Pi — one machine at a time. During the 30-day trial it all works with no code; after that, enter the licence in the web admin's License panel.
What you need
- Raspberry Pi 4 (1 GB RAM minimum, 2 GB recommended — 2 GB is required if you want NDI output) or Pi 5
- 16 GB SD card or larger, flashed with Raspberry Pi OS Bookworm 64-bit (Lite or Desktop both work)
- Network — Ethernet or Wi-Fi configured via Pi Imager's advanced options
Install (one command)
SSH into the Pi (or open a local Terminal) and paste:
curl -fsSL https://raw.githubusercontent.com/pltech-dev/kuma-timer-releases/main/install-pi.sh | sudo bashThe installer:
- Installs system libraries (
libfuse2,libportaudio2) via apt - Downloads the latest KUMA AppImage from GitHub releases
- Registers a
systemdservice that starts KUMA fullscreen on every boot - Redirects port 80 → 5555 so
http://<pi-ip>/reaches the admin panel - Seeds default admin credentials kuma / kuma (change under System after first login)
Takes 2-3 minutes on a good connection. Reboot when prompted.
After reboot
- Pi boots straight to a fullscreen timer (black background,
00:00) - From any device on the same network, open
http://<pi-ip>/→ log in as kuma / kuma → admin panel - Need the Pi's IP? The Pi's hostname is
kuma-timer.localon most networks — tryhttp://kuma-timer.local/first
Updates & maintenance
- One-click update: admin panel → System → Update KUMA Timer → Update now
- SSH update:
sudo /opt/kuma-timer/update-kuma.sh - Sync settings from your Mac/Windows: on the source machine open the web admin, System → Download this device's config. On the Pi, System → Import & Restart, select the downloaded JSON. Presets, cues, colours, integrations — everything portable — copy over. Password stays local.
- Emergency exit (plug a USB keyboard into the Pi): hold Ctrl+Alt+Q for 3 seconds
- Uninstall:
sudo /opt/kuma-timer/install-kiosk.sh --uninstall --user kuma
chmod +x, run. The kiosk installer above is optimised for dedicated Pi appliances.Quick-Entry Keyboard (Pi-only)
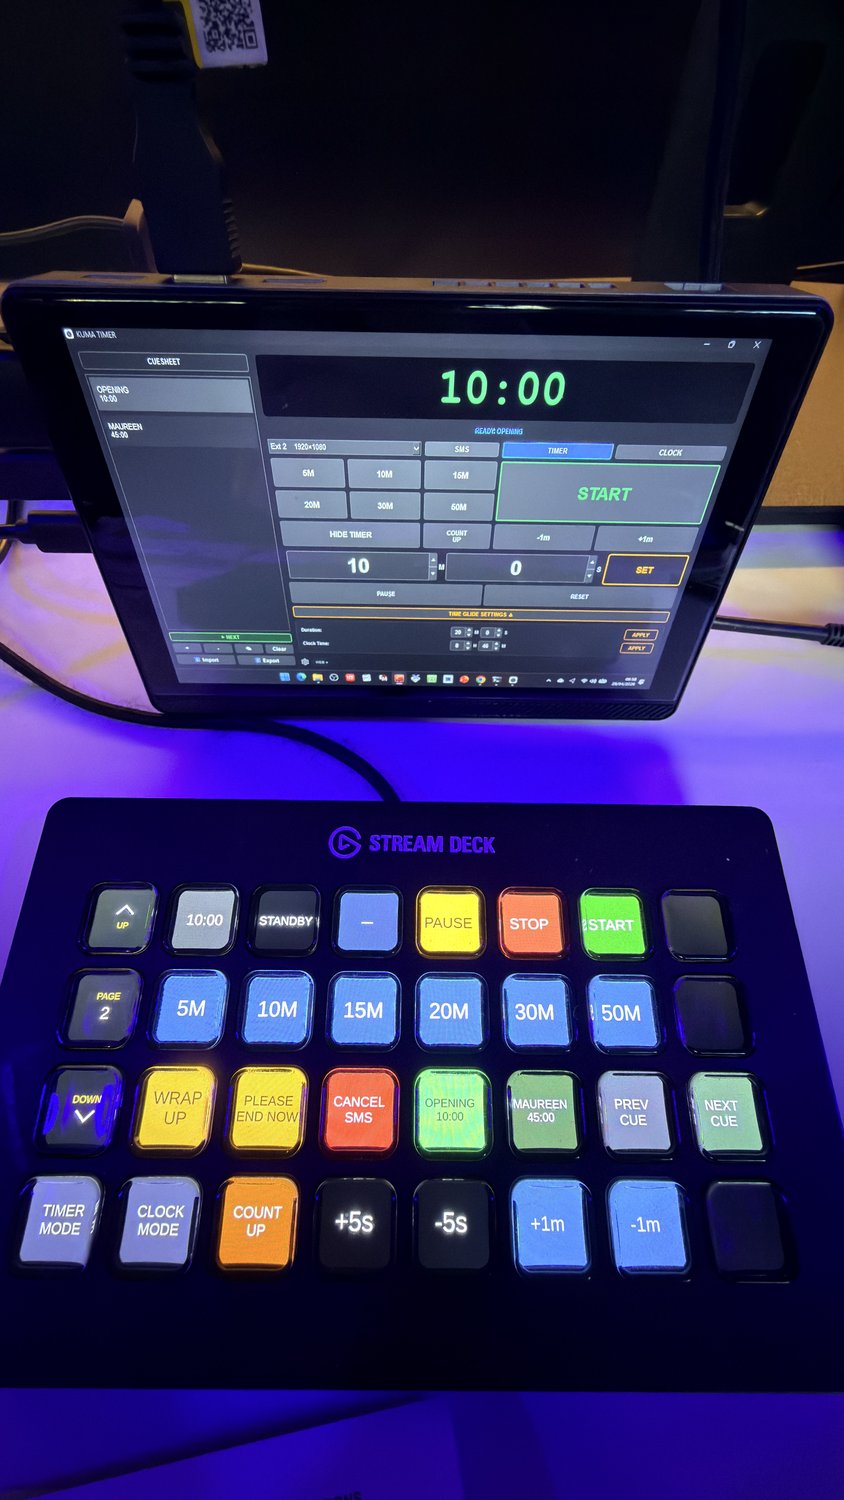
Plug a USB or Bluetooth numeric keypad into a Pi running KUMA in kiosk mode and you get a dedicated remote for time entry and transport — no second screen, no admin panel, no touch needed. Works equally well with a full keyboard, a USB-numpad, an Elgato Stream Deck Pedal, or any HID device that emits standard key codes.
Pick the device under Settings → Devices → Quick-Entry Keyboard. Once selected, KUMA grabs that device exclusively via the Linux evdev kernel interface — keystrokes never reach the desktop or any other application, so there is zero conflict with whatever else might be running on the Pi.
| Key | Action |
|---|---|
| 0 … 9 / KP 0 … KP 9 | Enter digits — live-preview in the big timer display |
| Enter / KP Enter | Apply the entered time and start the timer |
| . / KP . / Space | Pause / resume the running timer |
| Backspace / Delete | Hard reset — stop and clear to 00:00 |
| KP + | +1 minute (works whether timer is running or paused) |
| KP − | −1 minute (clamps at zero) |
| Esc | Clear the current digit-entry preview without resetting the running timer |
Live-preview rule of thumb: numeric keypads use the rightmost two digits as seconds, the next two as minutes, and any further digits as hours. Type 5 Enter → 00:05. Type 500 Enter → 05:00. Type 10000 Enter → 1:00:00.
Overview
KUMA Timer has two windows:
- Control Window — your operator view
- Display Window — the output sent to a projector or second screen
The display window can be sent to any connected screen and goes fullscreen automatically on secondary screens.
By default the display window opens when KUMA launches. Turn this off in Settings → Display → Open display window on startup to start with only the control panel — useful when you want to configure the show before putting anything on screen. Open the display later by selecting a screen from the Output dropdown.
Timer Controls
| Button | Action |
|---|---|
| START | Start the timer from the loaded time |
| PAUSE | Pause the running timer |
| RESUME | Resume after pause |
| RESET | Stop and clear the timer to zero |
| HIDE TIMER | Blank the display window (timer keeps running internally) |
| SHOW TIMER | Restore the display |
| −1m / +1m | Subtract or add 60 seconds while timer is running |
Setting the Time
Use the H / M / S spinboxes to enter the desired duration, then click SET to load it without starting.
- In MM:SS mode the H field is hidden
- In HH:MM:SS mode (Settings → Display) the H field appears
The status label above the controls shows the current state: STANDBY, LIVE, PAUSED, or the active speaker name.
Presets
Six quick-load buttons (e.g. 5M, 10M, 20M…).
| Interaction | Action |
|---|---|
| Click | Load that duration and set the manual input fields |
| Hold (0.6 s) | Edit the preset value — enter new minutes in the dialogue |
Presets are saved automatically to config.
Cuesheet / Runsheet
The left column is a runsheet of named speakers with individual times.
| Interaction | Action |
|---|---|
| Double-click a cue | Load that speaker's time and name into the timer |
| Drag & drop | Reorder cues — saved automatically |
| + button | Add a new cue (name + minutes + seconds) |
| − button | Delete the selected cue |
| Clear button | Remove all cues (confirmation required) |
| ✎ button | Edit the selected cue (name, minutes, seconds) |
| ▶ NEXT button | Advance to the next cue in the runsheet |
The sidebar can be hidden in Settings → Display → Show Runsheet. The cue name can be shown above the timer on the display window — toggle in Settings → Display → Show Cue Name on Display.
Import / Export
Cuesheets can be saved to disk and reloaded later — useful for re-running the same show, sharing between Mac / PC / Pi installs, or building your runsheet in a spreadsheet first. Two formats are accepted on import; export writes whichever extension you pick.
Download example files as a starting point and edit them in any text editor or spreadsheet:
- cues-example.json — JSON format (recommended; supports schedule fields)
- cues-example.csv — CSV format (opens directly in Excel / Numbers / Google Sheets)
JSON format
Wrapped object with a cues array (recommended), or a bare list of cue objects. Each cue needs at minimum name plus a duration:
{
  "kind": "cuesheet",
  "cues": [
    { "name": "Welcome speech",     "min":  5, "sec":  0 },
    { "name": "Maureen Fitzgerald", "min": 30, "sec":  0, "scheduled_at": "10:15" },
    { "name": "Coffee break",       "min": 15, "sec":  0 },
    { "name": "John — keynote",     "min": 45, "sec":  0, "scheduled_at": "11:00" }
  ]
}
Field reference — most have aliases so casual hand-writing works:
| Field | Required? | Aliases accepted | Notes |
|---|---|---|---|
name | yes | cue · title · speaker | Trimmed and capped at 200 chars. |
min | yes (or time) | minutes | Integer ≥ 0. |
sec | defaults to 0 | seconds | Integer ≥ 0. If sec ≥ 60 the overflow rolls into min. |
time | alternative to min/sec | — | String "MM:SS" or "HH:MM:SS" as a duration (not a wall-clock time). |
scheduled_at | optional | schedule · scheduled | Wall-clock auto-fire time, 24-hour "HH:MM". The cue loads + starts automatically when the host clock reaches this time. Skip the field for cues with no fixed start time. |
CSV format
One row per cue. Header row is optional but recommended — the importer auto-detects column meaning from header names. Without a header it expects column order: name, minutes, seconds, scheduled_at. Comma, semicolon and tab delimiters are all auto-detected, and a UTF-8 BOM (Excel's "Save as CSV UTF-8") is stripped silently.
name,minutes,seconds,scheduled_at
Welcome speech,5,0,
Maureen Fitzgerald,30,0,10:15
Coffee break,15,0,
John — keynote,45,0,11:00
Q & A,20,0,
Same field aliases as JSON: column header name / cue / title / speaker, minutes / min / m, seconds / sec / s, scheduled_at / schedule / scheduled / start / start_time. A column called time / duration / length is treated as a single "MM:SS" / "HH:MM:SS" string and replaces separate min/sec columns.
scheduled_at column shows up as 10:15:00 instead of 10:15, that's Excel auto-formatting it as Time. Format the column as Text before saving (Format Cells → Text), or save and edit the raw CSV in a plain text editor. The importer accepts both forms regardless.How import works
- Click Import on the cuesheet sidebar (or Settings → Cuesheet → Import).
- Pick a
.jsonor.csvfile. Format is auto-detected by extension; if the extension is unfamiliar the file's first byte decides ({/[→ JSON, anything else → CSV). - The file is parsed defensively. Rows with missing
nameor non-numeric durations are skipped with a warning rather than aborting the whole import — you'll see a summary dialog if any rows were skipped. - Imported cues replace the current cuesheet. The previous list is overwritten — make a quick Export first if you want a backup.
Display Modes
Use the TIMER / CLOCK toggle in the control panel:
| Mode | Display shows |
|---|---|
| TIMER | Countdown (or count-up in overtime) |
| CLOCK | Current wall-clock time (HH:mm:ss) |
Visual styles
Each mode has its own visual style picker in Settings → Display. Pick separately for the timer and for the clock — the count-down look does not have to match the time-of-day look.
| Style | Available in | Best for |
|---|---|---|
| Text | Timer · Clock | Default — large monospace digits with optional progress bar. |
| Round | Timer · Clock | Circular ring around the digits; great for analog feel. |
| RounDOT NEW | Clock only | Faithful BBC pip / Wharton broadcast clock — dot-matrix HH:MM with two concentric red rings ticking the seconds. |
RounDOT — BBC pip / Wharton clock face
The classic broadcast countdown look — black panel, red LED-style dots. The outer ring of 60 dots ticks one per second; the inner ring of 12 dots lights every 5 seconds, marking the pip moments. The big HH:MM in the centre and the smaller SS below are 5×7 dot-matrix glyphs. RounDOT is time-of-day only — it doesn't make sense for a count-down, so the picker only offers it on the Clock side.
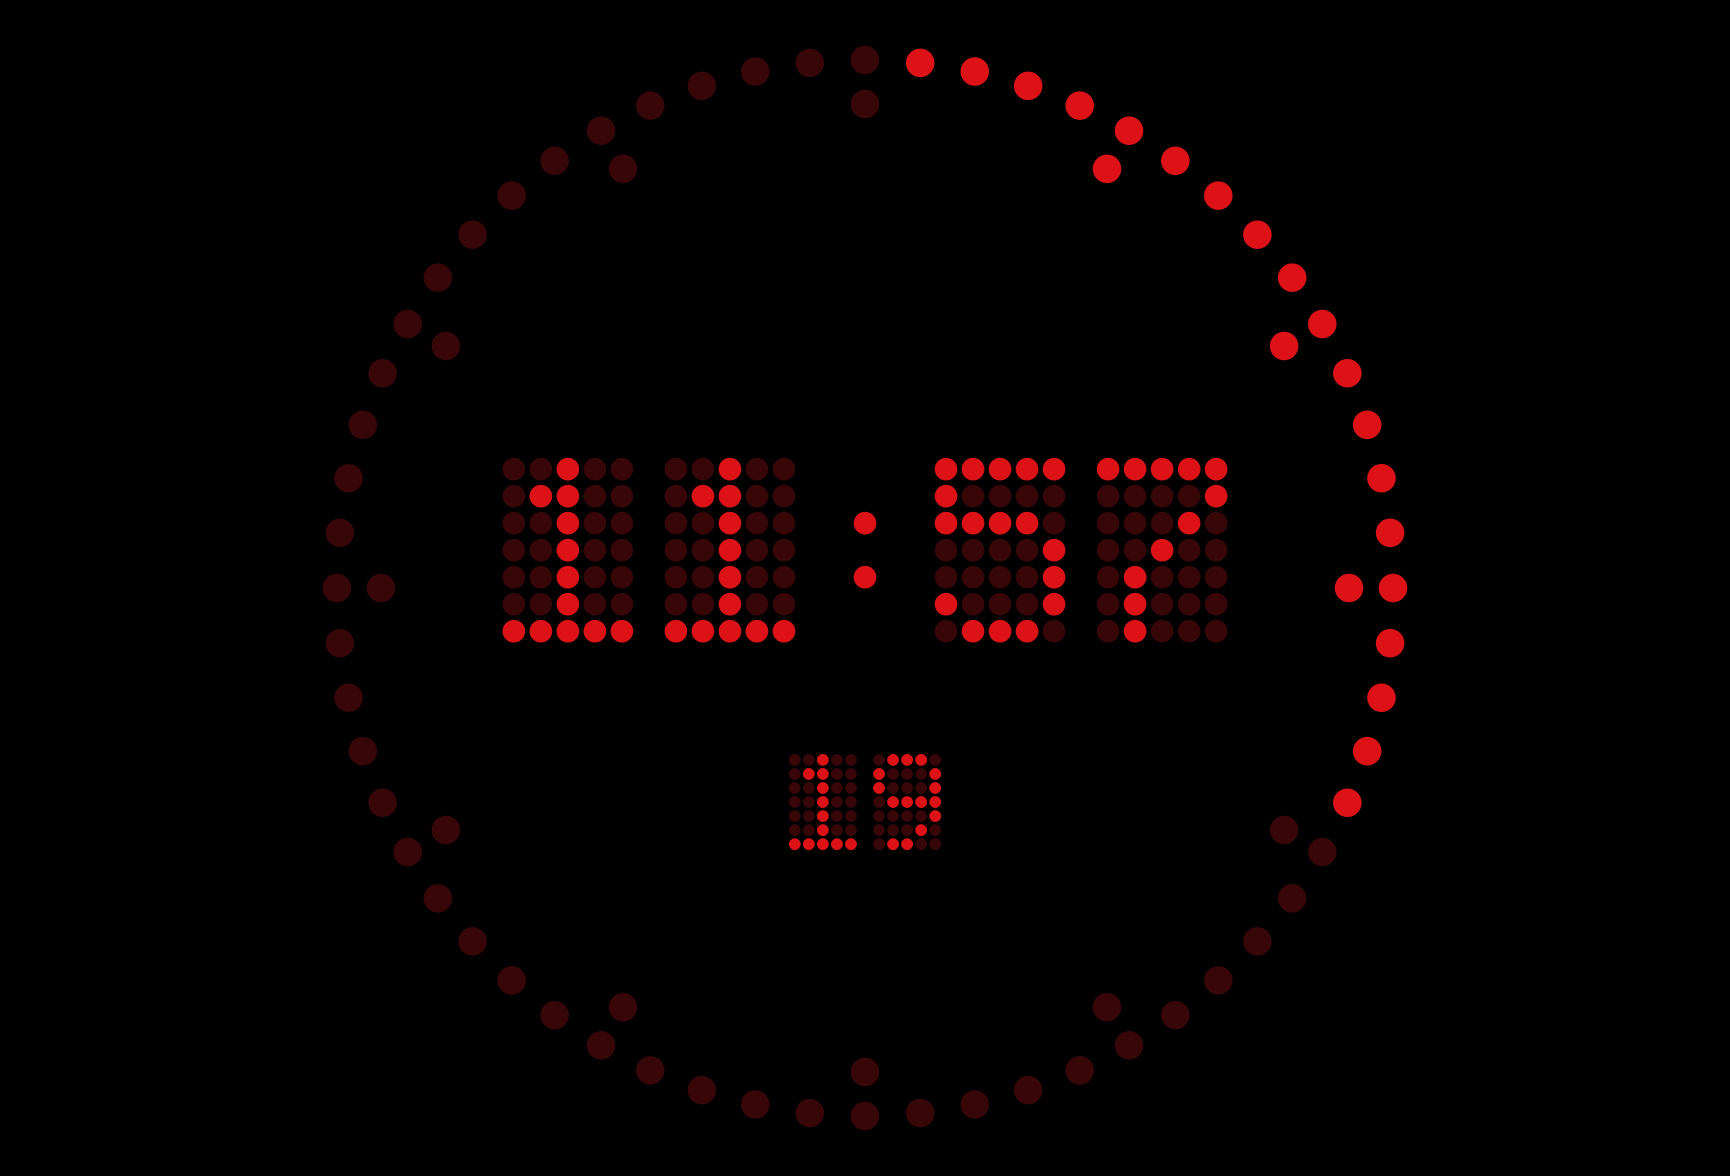
Once picked on the host, RounDOT renders identically on every surface that mirrors the time of day:
- Main display window — Mac / Windows secondary screen, Raspberry Pi kiosk in fullscreen.
- NDI output — vMix / OBS / Resolume see the same dot-matrix face on their video bus.
- KUMA Live web viewer — anyone you've shared the QR / link with sees RounDOT on their phone.
- Web mirror served from the host (
http://<host-ip>:5555). - iOS / iPadOS Companion Monitor mode — iPhone or iPad on the lectern shows the same look.
- Presenter View Mode (PVM) floating window for the operator.
Progress bar position (v1.12.x)
Settings → Display → Bar Position picks where the bar sits relative to the timer:
- Bottom (window edge) — default, bar pinned to the bottom of the window
- Top (window edge) — Irisdown-style, bar above the digits
- Adjacent (below timer) — bar tucked directly below the digit baseline; the [digits + bar] block sits as a vertically-centred unit. Tunable signed offset (-50…+100 px) for fine control over the gap; negative pulls the bar up into the digit baseline area for tight integration.
Timer size adjustment (v1.12.x)
Settings → Display → Timer size is a signed delta percentage that scales the auto-fit timer font. 0 = auto (default), +50 = 50 % larger (great for picture-in-picture / preview-monitor setups where the auto calc is too small), -30 = 30 % smaller. Range -90…+500 %.
Screen Selection
The dropdown at the top of the control panel lists all connected screens (e.g. Primary 2560×1600, Ext 2 3840×2160). Select a screen to move the display window there. On a secondary screen it goes fullscreen automatically; on the primary screen it opens as a regular window.
Send Message to Screen
The SEND SMS button sends a text message to the display window.
- Click SEND SMS — a dialogue opens
- Pick a saved or recent message, or type a new one (max 300 characters)
- Set duration (1–600 seconds) and optional effects
- Click OK
Display modes
- Bar (default) — message appears in a horizontal bar at the top or bottom of the display window, scrolling from right to left if wider than the container
- Fullscreen — check Fullscreen to take over the entire display window; the timer is hidden and the message auto-scales to the largest readable font size that fits the screen. The timer reappears automatically when the message expires or is cancelled.
Enable Scroll to force scrolling even for short messages. Enable Flash for a flashing background effect. The button changes to CANCEL SMS while the message is active.
Display defaults (text colour, border colour, size, position) and saved messages are managed in Settings → SMS. The Invert scroll direction option is available there for right-to-left languages (Arabic, Hebrew).
The browser mirror page (http://<ip>:5555) shows both the bar and fullscreen SMS overlay in sync with the display window.
Time cut — Glide & Jump
KUMA gives you two ways to bring a running countdown forward to finish at a specific time. Both are transparent — the audience never sees an explicit "we're cutting time" event. Pick the mode that suits your show:
| Mode | How it looks | Best for |
|---|---|---|
| GLIDE | Tick rate accelerates — seconds count down faster than 1 Hz (e.g. 4× to compress 10 min into 2.5 min). Numbers tick smoothly, just quicker. | Tight cuts where the audience isn't actively reading the clock, or backstage / monitor-only timers. Simple to grasp, instantly responsive. |
| JUMP | Seconds tick at exactly 1 Hz the whole time. The cut is hidden as a series of small skips (10 / 20 / 30 s blocks) at strategically chosen moments — landing on round boundaries (:00 preferred, then :30) so the eye reads "I just looked away for a second" rather than spotting accelerated digits. Last 3 minutes of any run are always clean — no jumps in the home stretch. |
On-stage timers, presenter-facing displays, broadcast feeds. When the audience can read the clock and you want the cut to be invisible. |
Switching mode
The GLIDE / JUMP segmented control sits at the top of the time-cut panel on the host display, in the web admin's Time cut card, and is reachable on iOS Companion via long-press of the TIME GLIDE / TIME JUMP button. The chosen mode is saved per show, so if you always run hidden cuts, set it once and forget.
Applying a cut
Open TIME GLIDE SETTINGS ▲ (or TIME JUMP SETTINGS ▲ when in jump mode) on the host. Two ways to specify the target:
- By duration — "finish in H:M:S from now" (e.g. cut a 25-min preset down to end in 20 min).
- By clock time — "finish at HH:MM" (e.g. wrap by 14:00).
The panel APPLY button computes the difference and either glides or jumps depending on mode. The same panel exists in the web admin SPA and on iOS — they all drive the same engine.
| Button | Action |
|---|---|
| APPLY | Activate the cut — host + every connected surface (PVM, NDI, web, iOS) follow within ~100 ms |
| CANCEL GLIDE / CANCEL JUMP | Drop the cut campaign immediately and restore plain 1-Hz countdown |
How JUMP picks landing points
When you ask JUMP to cut N seconds, the engine plans the campaign in advance:
- Reserves the last 3 minutes (180 s) as a "no-jump zone" so your finish reads cleanly.
- Picks the largest block size (30 / 20 / 10 s) that divides N cleanly and fits enough jumps into the available time without crowding.
- Spreads the jumps roughly evenly across the remaining countdown.
- Snaps each landing to a round multiple of 10 s, scoring
:00highest,:30next,:10/:20/:40/:50as fallback. The result reads as a series of "I blinked and it skipped a beat" moments, never a visible fast-forward.
Example: cut 5 minutes from a 40-minute timer → 10 jumps of 30 s, spread one every ~3:30, each landing on the nearest :00 minute boundary.
Overtime
When the timer reaches zero:
| Setting | Behaviour |
|---|---|
| Count Up | Timer continues with a − prefix and red colour |
| Stay at 00:00 | Timer freezes at zero |
| Stop Timer | Timer stops completely |
Additional options in Settings → Behaviour: change background colour, blink, show a custom message (e.g. PLEASE WRAP UP), send an OSC trigger to Companion. (Behaviour tab also hosts Scheduled Cues — moved here from the old Misc tab.)
OVERTIME label (Count Up & Stay at 00:00)
A coloured text label that appears near the digits when the timer enters overtime. Available when Behaviour at 00:00 is Count Up or Stay at 00:00.
Configurable in Settings → Behaviour → OVERTIME:
- Text — custom label (default "OVERTIME")
- Colour — text colour (default red)
- Position — Above or below timer
Renders on host, NDI, KUMA Live and iOS. In the Layout Editor you can freely position and resize the OVERTIME field.
Audio Cues
Settings → Audio Cues — audible chimes that fire at the same moments the display changes colour, so the speaker hears the warning without watching the screen.
How it works
Cues are tied to the colour-transition thresholds you've already set in Settings → Display (Orange at N min remaining and Red at N min remaining). Because the thresholds derive from the colour settings, they scale with event length automatically — a 10-minute talk and a 60-minute keynote use proportional warning windows.
| Cue | Fires at | Default sound |
|---|---|---|
| Orange transition | Remaining = color_orange_min × 60s (default 3 min) | Warm chime |
| Red transition | Remaining = color_red_min × 60s (default 1 min) | Double bell (two-strike) |
| Time-up | Remaining = 0:00 (one-shot, never repeats) | Soft gong (long warm decay) |
Bundled sounds
Six procedurally-generated samples ship with KUMA Timer — designed for stage-friendly, not aggressive sirens:
- Warm chime — Tibetan-bowl style, soft 1-min warning
- Bright chime — sharper alternative
- Double bell (two-strike) — classic 30-second pattern
- Soft gong — long warm decay, time-up
- Three-beep alarm — harder time-up alternative
- Subtle tick — used for GTS pips and red-zone beeps
Each cue has a volume slider (0–100) and a Test button so you can preview before showtime.
Custom WAV / MP3 upload
Click Add custom sound… at the bottom of the Audio Cues tab to import your own sample. The file is copied into ~/.kumatimer/sounds/ and added to all three sound dropdowns as Custom: yourfile.wav.
Two opt-in extras
- BBC GTS pips — last 5 seconds: short clicks at remaining 5, 4, 3, 2, 1, the same Greenwich Time Signal pattern broadcast by the BBC since 1924. Off by default; broadcast operators turn it on for live TV / radio handovers.
- Red-zone continuous beep: every other second while remaining is in the red zone (Limitimer-style). Off by default; useful when the speaker isn't watching the screen and a single chime won't cut through.
Mirror to iOS Companion (Monitor mode)
If the speaker has an iPad on the lectern running KUMA Companion in Monitor mode, the host normally plays cues only on its own audio output. Toggle "Play on iOS Companion" to mirror every fired cue to subscribed iPads / iPhones, which then play their own bundled equivalents.
What happens after time-up
By industry convention (matches BBC, Stagetimer, DSAN Limitimer defaults): after the time-up gong, audio goes silent. Visual overtime cues continue (background colour change, blink, OVERTIME label), but no further chimes — the gong already signalled "time's up" and additional beeps would be antagonistic. Operators who specifically want to keep nudging the speaker should enable the red-zone continuous beep, which fires every other second leading up to zero.
Presenter View Mode
Settings → Display → Enable Presenter View Mode
PVM creates a small floating window that stays always on top of all other applications — including PowerPoint and Keynote in fullscreen. The window does not steal keyboard focus, so your presentation clicker continues to work normally.
Window controls
| Action | Result |
|---|---|
| Drag centre | Move the window |
| Drag edge or corner | Resize — font auto-scales to fill |
| Hover over window | Reveal controls: START/STOP · PAUSE · −1m · +1m |
| Right-click | Bring the main KUMA Timer control panel to the front |
Transparent background (v1.12.x)
Settings → Display → Transparent background swaps the solid black PVM panel for full alpha — the slide underneath shows through, only the digits, controls and a hover-only dashed orange frame remain visible. Useful when overlaying PVM on top of a Keynote / PowerPoint slide so the visual context is preserved. Off-hover the frame disappears entirely so the slide is unobstructed; mouse-in re-paints a 3-px dashed border around the window so you can spot the resize edges.
One-time macOS permission prompt (first PVM launch)
The first time you enable PVM on macOS, the system will show a one-time permission dialog asking to allow KUMA Timer to control "System Events":

Click Allow. This grants the auto-focus-return feature: when you click any PVM button (START / PAUSE / ±1m), focus jumps back to your slideshow within ~2 seconds so the next clicker press advances the slide instead of doing nothing. Without this, you'd have to manually click into Keynote / PowerPoint after every PVM interaction.
The permission is stored once in System Settings → Privacy & Security → Automation → KUMA Timer. You will not see the dialog again on this Mac. If you click Don't Allow, PVM still works — you just lose the auto-focus return; you can re-enable later from the same Privacy & Security panel.
macOS requires this consent for any app to send AppleScript / Apple Events to another app (Mojave 10.14+). KUMA Timer uses it only to read the currently-frontmost app and bring it back to the front after a PVM click — no other automation, no scripting of your slides, no data is read.
Typical workflow
- Set your duration and open Keynote / PowerPoint
- Enable PVM in Settings → Display — the floating window appears
- Position and resize the window (e.g. corner of your laptop screen)
- Click into Keynote and start your slideshow
- Press START (hover the floating window) or use OSC/Companion
- The countdown stays visible — your clicker works as normal
- Right-click the floating window to bring the control panel back
LTC Receiver Mode
KUMA Timer can read incoming LTC (SMPTE Linear Timecode) from a sound card and display it on the output screen — useful as a timecode reader in broadcast or live production rigs.
Setup
- Connect the LTC output of your timecode generator to the line input of your sound card
- Open Settings → LTC
- Check Enable LTC Input and select the correct audio input device
- Click Save Settings
When LTC is active
- The display window shows the timecode as HH:MM:SS:FF in cyan
- The status label shows ● LTC RX
- All timer controls are disabled — KUMA is in read-only mode
Web Mirror
When enabled (Settings → Network → Enable Web Mirror Server), KUMA runs a local HTTP server. Open http://localhost:<port> in any browser on the same network to see the timer — useful for confidence monitors, tablets, or phones.
The progress bar in the web view follows the global Enable Progress Bar setting.
5555 and bump the others (5556, 5557, …) under Settings → Connections → Web Mirror port. If two hosts try to bind the same port, the second one's web server, Companion module endpoint, and OSC bridge will all silently fail to start. Same rule applies to the OSC port (default 9000).Web Controller
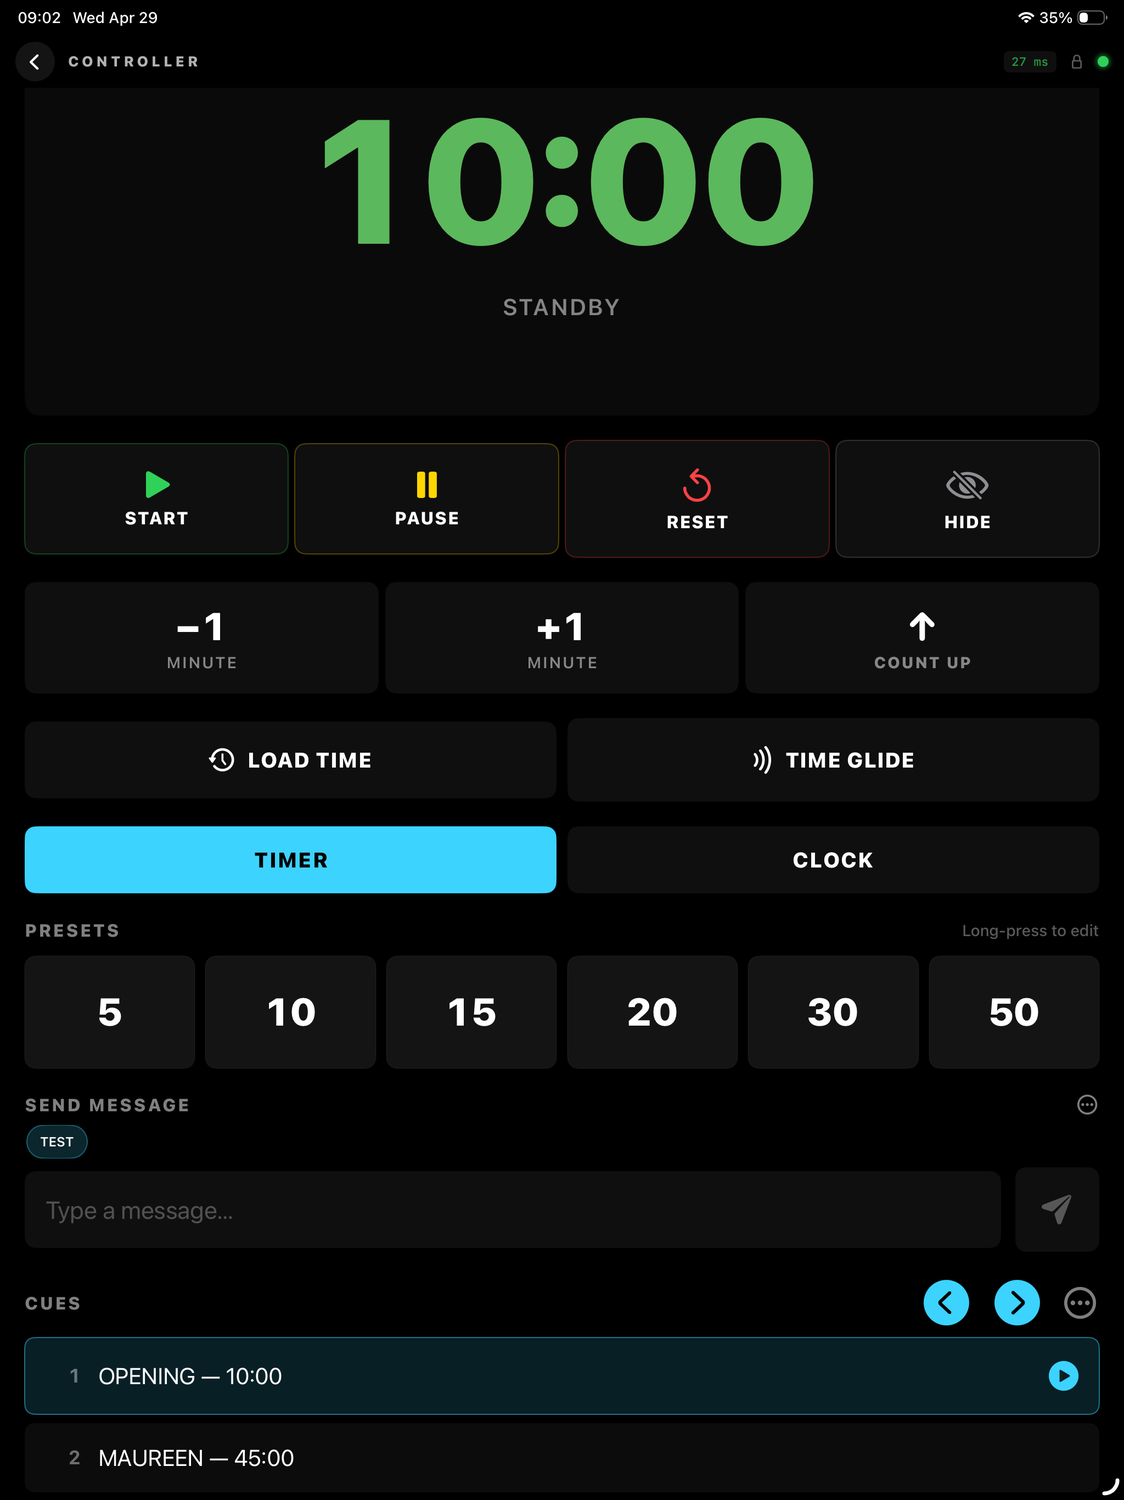
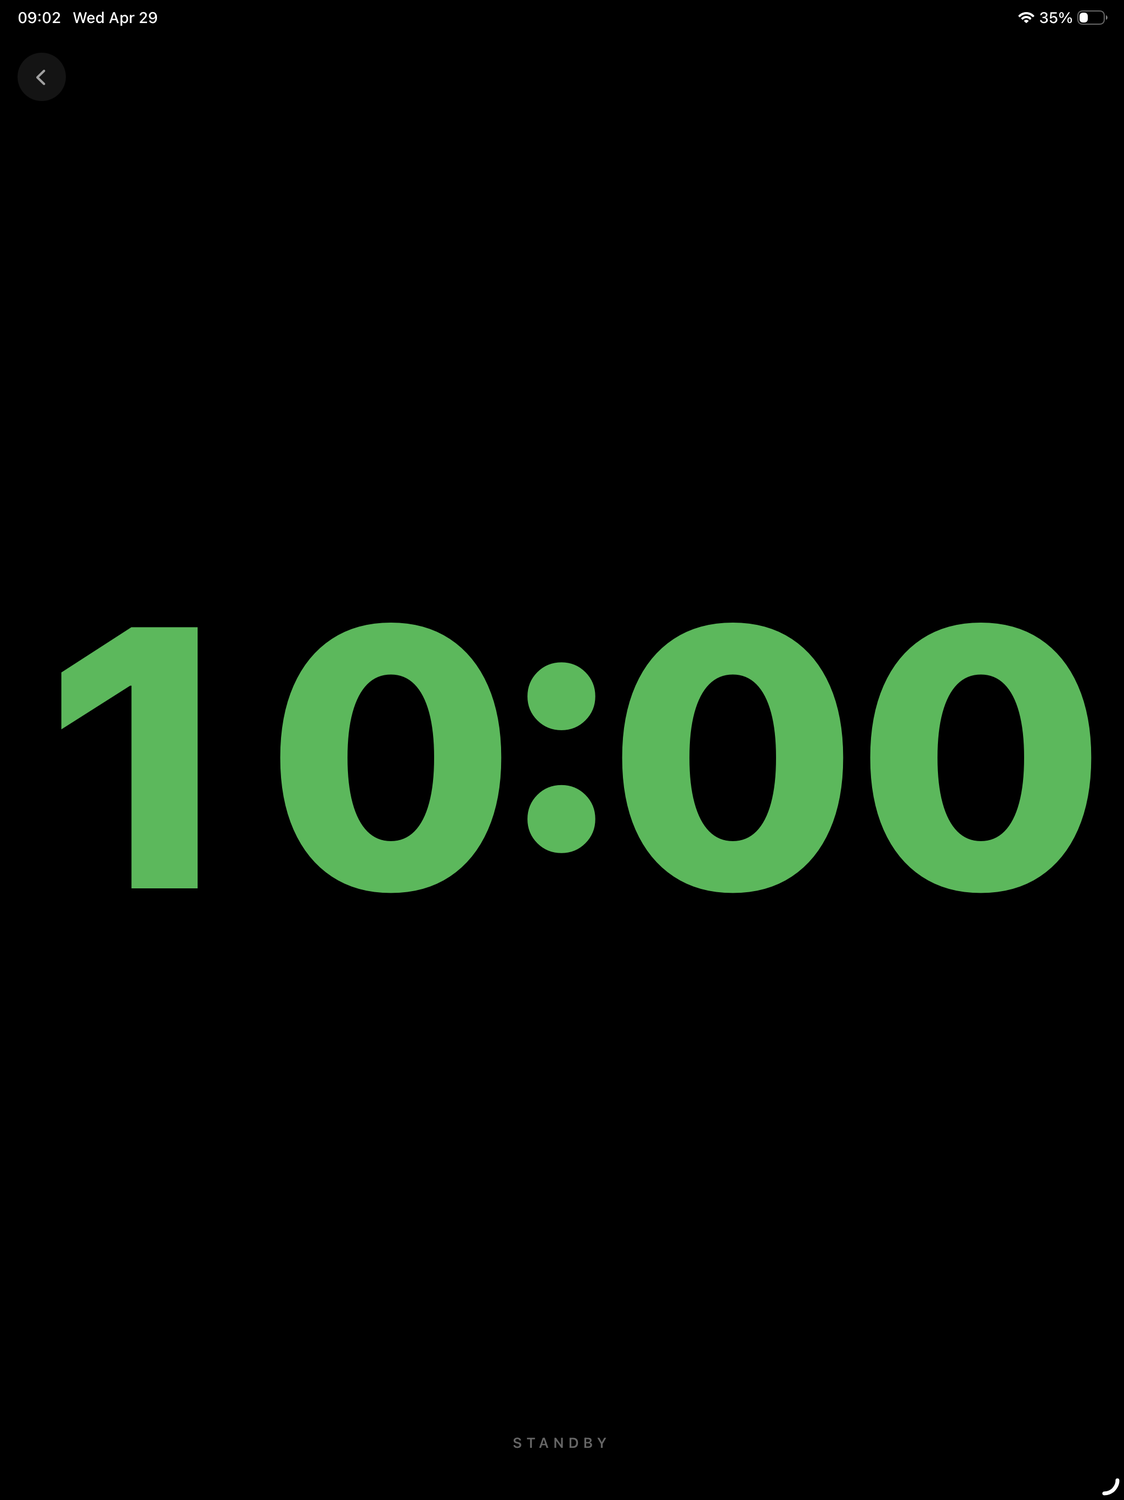
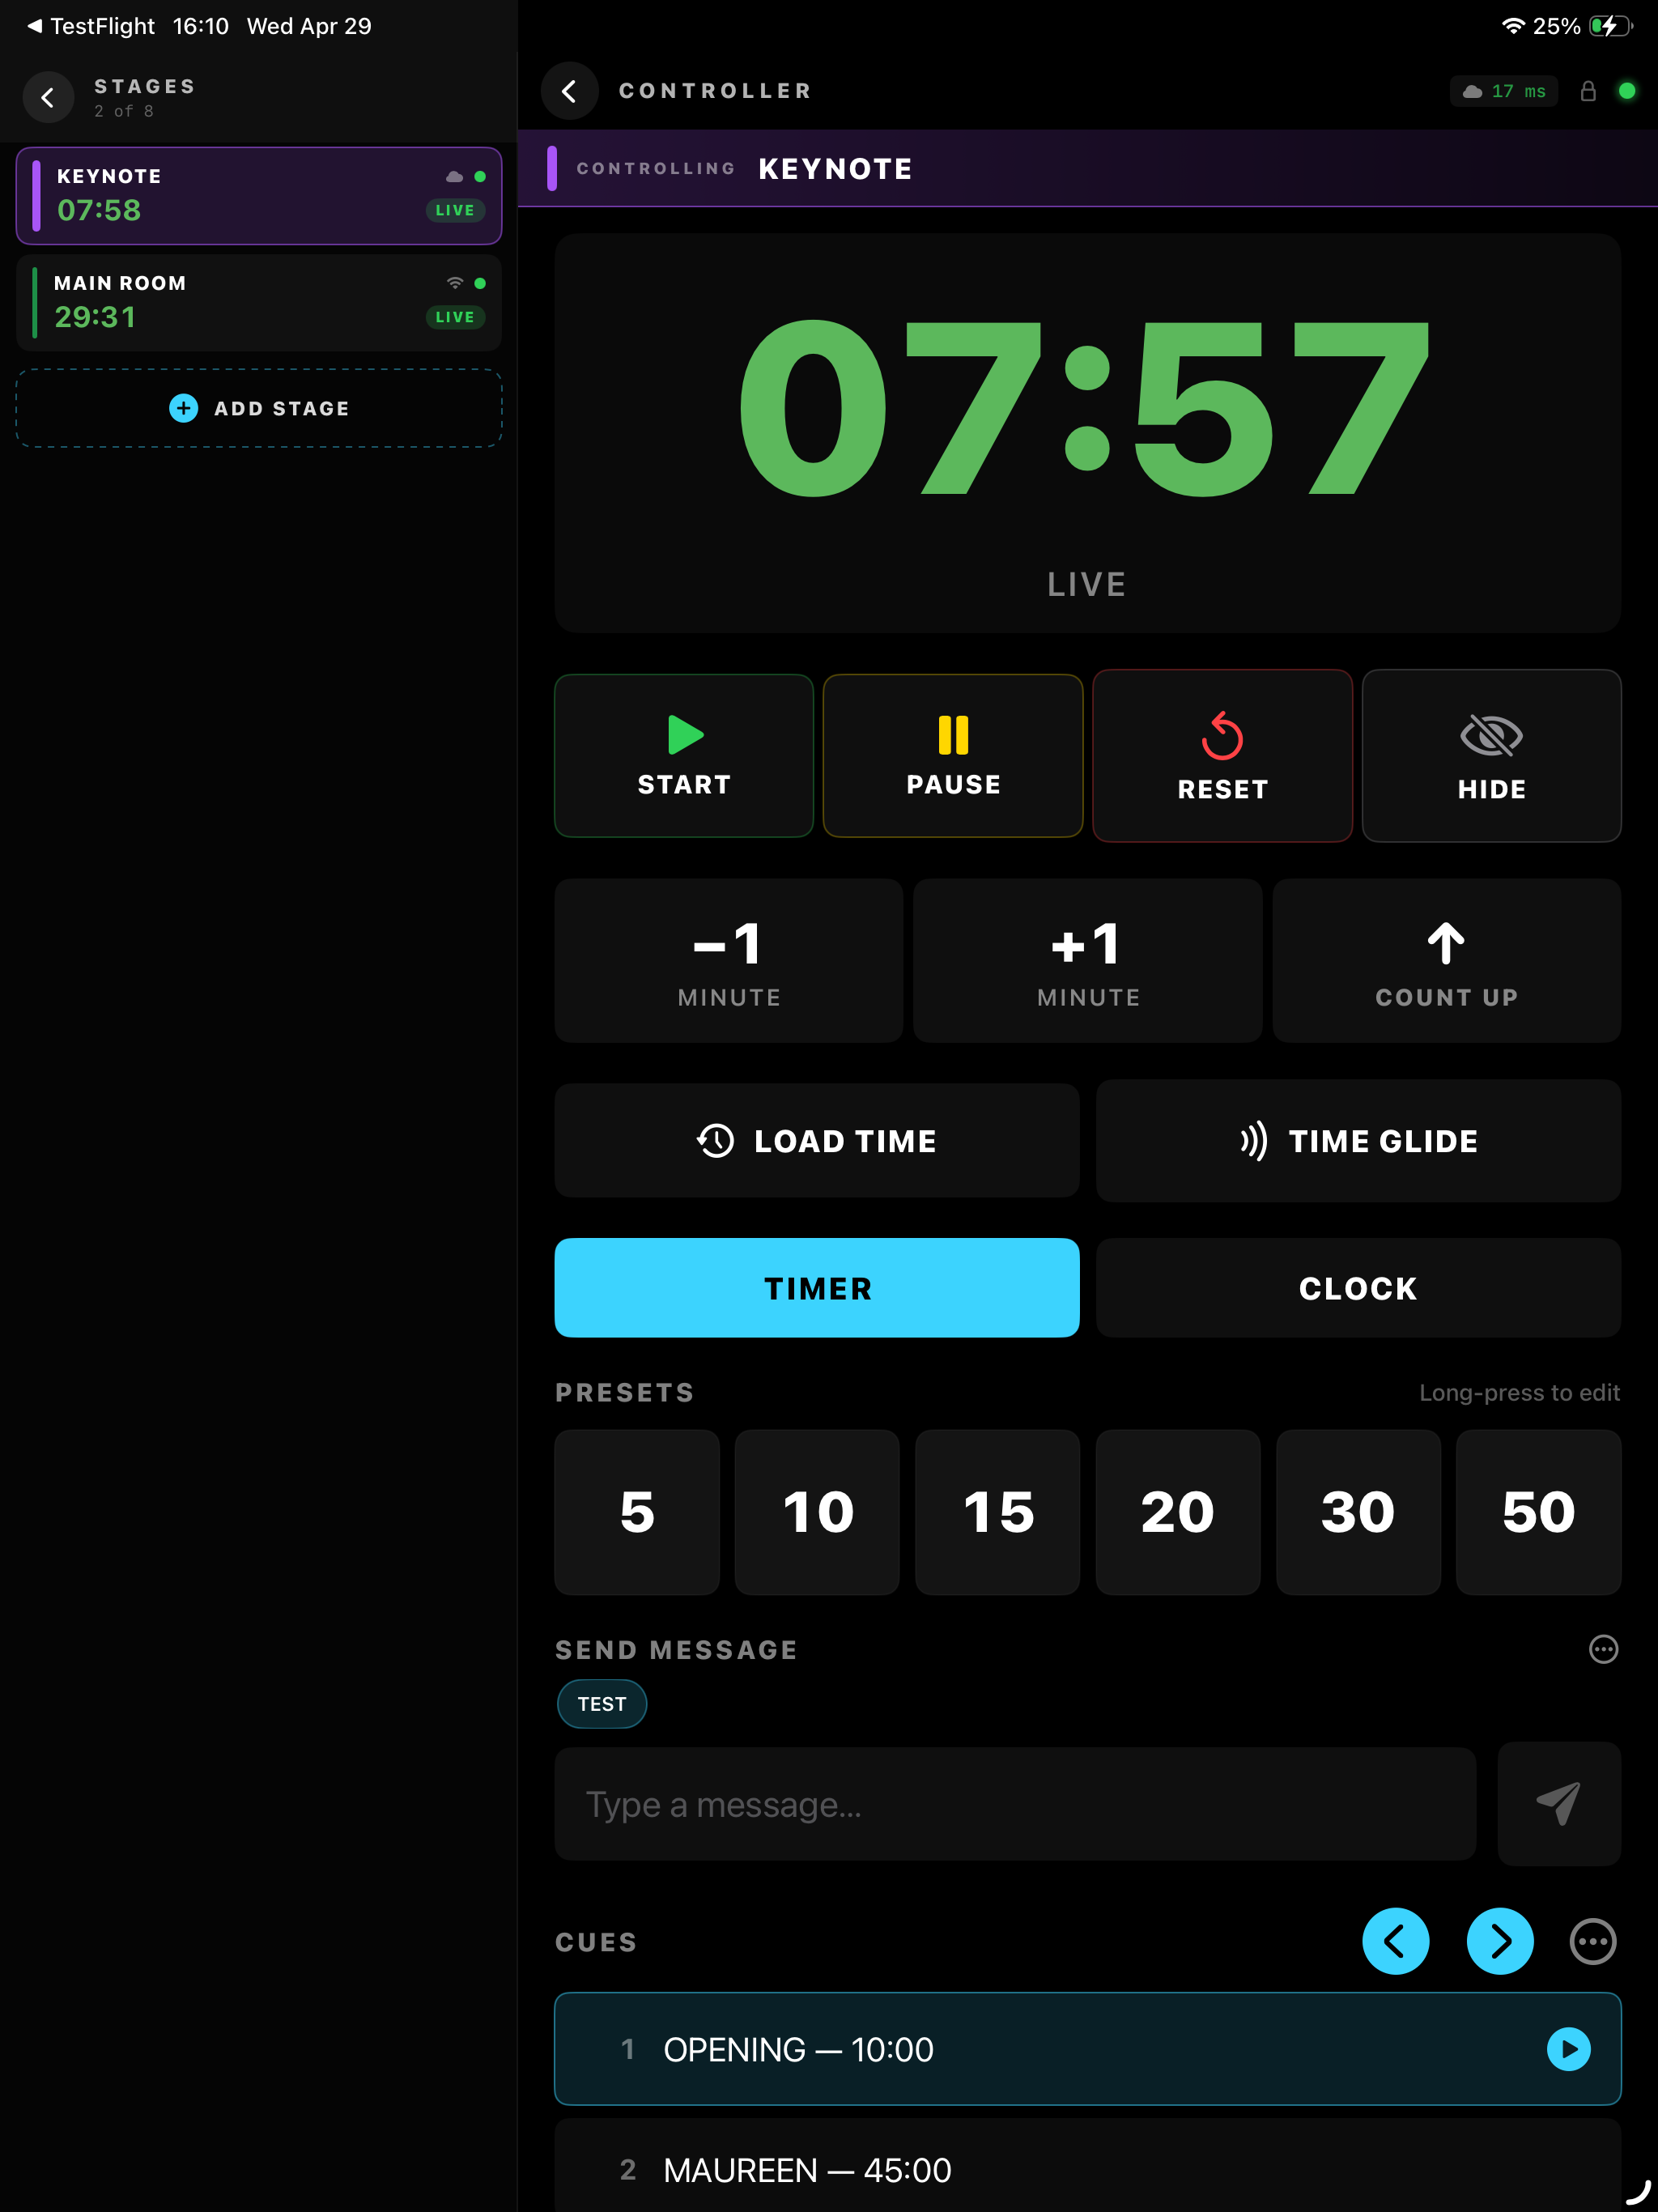
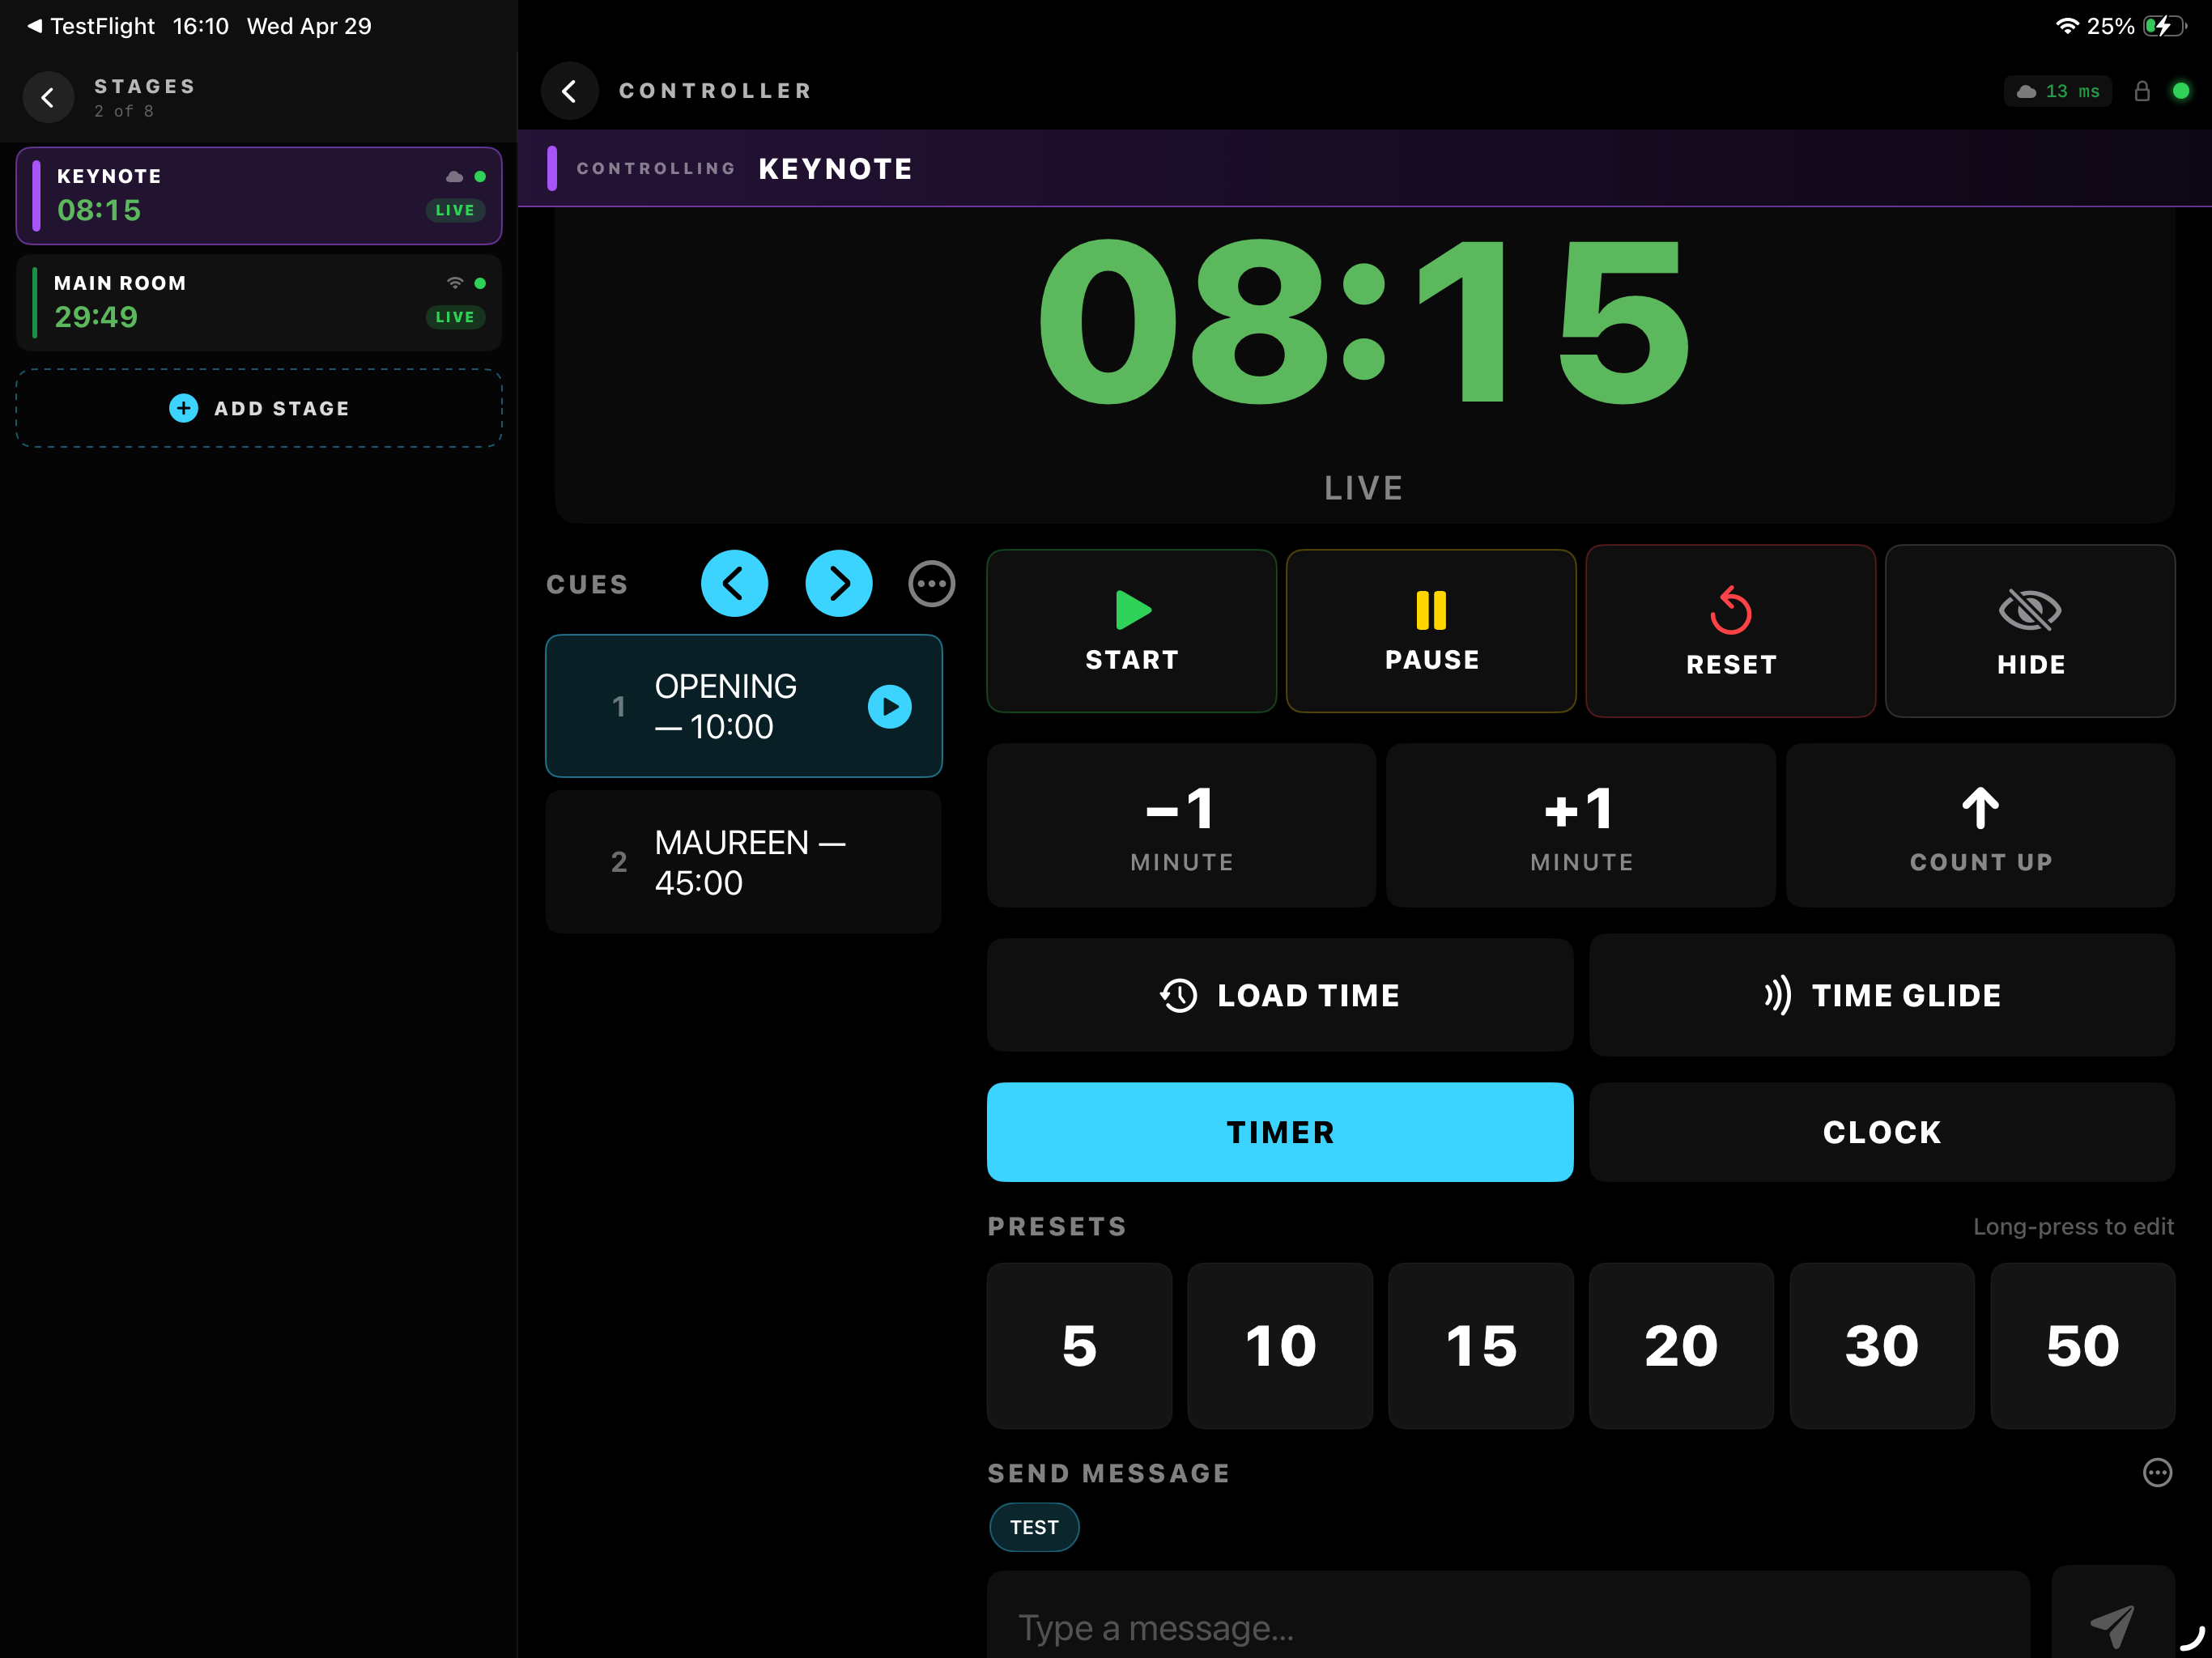
The Web Controller is a browser-based control panel protected by a password — useful for a second operator, a director's tablet, or a phone on the production desk.
Setup
- Make sure Web Mirror / API Server is enabled in Settings → Connections
- Set a Controller Password in the same section (leave blank to disable the controller)
- Click Save Settings
- Open
http://<IP>:<PORT>/controlin any browser — the settings dialogue shows the exact link
Available controls
- Live timer display with progress bar
- START · PAUSE · RESET · HIDE TIMER
- −1 min / +1 min
- Preset buttons (loaded dynamically from app config)
- PREV CUE / NEXT CUE navigation
- Scrollable cue list — click any cue to load it directly
Web Admin SPA — full settings in the browser
Alongside the minimal /control page, KUMA hosts a complete admin single-page app at http://<IP>:<PORT>/admin. This is the same set of settings, presets, cuesheet, and SMS that you'd reach from the desktop's ⚙️ Settings dialog — but in the browser, so a director on a tablet or a producer on a second laptop can edit everything without standing over the operator's shoulder.
Login uses the same Controller Password with username kuma. Default credentials on a fresh install are kuma / kuma — the SPA shows a banner reminding you to change them.
- Edit presets (length + colour) without restarting
- Add / reorder / delete cues
- Toggle iOS Companion remote control, KUMA Live, audio cues
- Tweak warning thresholds, fonts, colours, progress bar style
- Send / cancel SMS overlays
- Trigger time cuts (GLIDE / JUMP) with the same picker as the host
/control and /admin) are shown with one-click QR codes in Settings → Connections. Scan with a phone for instant access.NDI Output
KUMA Timer can broadcast a full 1920×1080 NDI® video stream that mirrors the display window — timer, cue name, SMS bar and progress bar — to any NDI-compatible application on the network (vMix, OBS with NDI plugin, Resolume, Wirecast, etc.). Powered by NDI® — learn more at ndi.video.
Setup
- Open Settings → Connections and scroll to the NDI Output section
- On first enable, a licence acceptance dialogue appears — scroll through and click Accept
- Check Enable NDI Output and click Save Settings
- The status bar shows
NDI ●(amber while initialising, green when active) - In your NDI receiver, look for the source named KUMA Timer
What the NDI stream includes
- Timer text — same font, colour and size as the display window
- Cue name (if enabled in Settings → Display)
- Progress bar (respects the Show Progress Bar setting)
- SMS bar when a message is active
Timer Font
Choose the font used in both the display window and the NDI stream in Settings → Display → Timer Font. All available options are monospace — the font size stays perfectly consistent regardless of which digits are displayed.
Wireless Secondary Displays
KUMA can mirror the countdown to dedicated hardware screens over Wi-Fi — no cables, no extra software on the display side. Two device types are supported:
- Ulanzi TC001 — 8×32 RGB LED matrix, ~$50. Ships without KUMA firmware; one-click flash from the browser. Great for stage-edge / desk use.
- ESP32-S3-BOX-3 — 320×240 IPS colour LCD, ~$40. Flash once from the browser; mounts anywhere with a USB-C cable for power.
Both mirror: countdown value, zone colours, background colour, overtime blink, progress bar and SMS messages. Both support Local mode (same LAN as host, UDP) and Cloud mode (different Wi-Fi network, polls the relay).
Flash your device
Chrome or Edge required. Open the flasher page, connect the device via USB, click Install.
Connect to KUMA host
- After flashing, the device broadcasts a Wi-Fi hotspot (
KUMA-Display-XXXXorKUMA-TC001-XXXX). - Connect your phone or laptop to that hotspot and open
http://192.168.4.1. - Enter your Wi-Fi credentials and (for Cloud mode) the Poll URL from Settings → Connections → ESP32-S3-BOX / Ulanzi TC001 → Cloud → Copy URL.
- The device reboots and joins your network. It appears in KUMA's bottom status bar when active.
Ulanzi TC001 button controls
The three buttons on top of the TC001 (left / middle / right):
| Action | Result |
|---|---|
| Left or Right — single click | Toggle Local ↔ Cloud mode, then scroll the device's IP address |
| Left — double-click | Show battery % (colour-coded: green > 50, amber 20–50, red < 20) |
| Left — long press (1.5 s) | URL SETUP — re-enter the Poll URL / screen name (magenta flash on entry) |
| Right — long press (1.5 s) | WIFI SETUP — change Wi-Fi network (blue flash on entry) |
On connect the device scrolls its IP for a few seconds so you can find it on the network. In a frame-accurate (FR) clock format the LED shows the plain MM:SS / HH:MM:SS (frame digits don't fit the matrix). When the screen is mounted upside-down, enable Settings → Connections → Ulanzi TC001 → Rotate display 180°.
KUMA Live (Cloud Relay)
Share your timer with remote speakers over the internet. KUMA Live pushes the timer state to the cloud so anyone with the link can watch the countdown in a browser — no LAN or VPN required.
How it works
- Open Settings → Connections → KUMA Live
- Click Generate QR Code — a unique session URL is created
- Share the QR code or URL with up to 2 remote viewers
- Viewers open the link on any device — the timer mirrors in real-time
Remote messaging
Enable Allow remote viewers to send messages in settings. Viewers can type a message in their browser which appears on your timer display — useful for stage managers or producers giving timing cues to speakers remotely.
Session limits
- Maximum 2 viewers per session (additional viewers see "Session Full")
- Sessions auto-close after 60 minutes of inactivity (no active countdown)
- Time-of-Day (clock) mode — each viewer renders its own local clock
Controls
- Generate QR Code — starts a new session and shows the QR code
- Save QR as PNG — save the QR code image to disk
- End Session — immediately stops the relay and disconnects all viewers
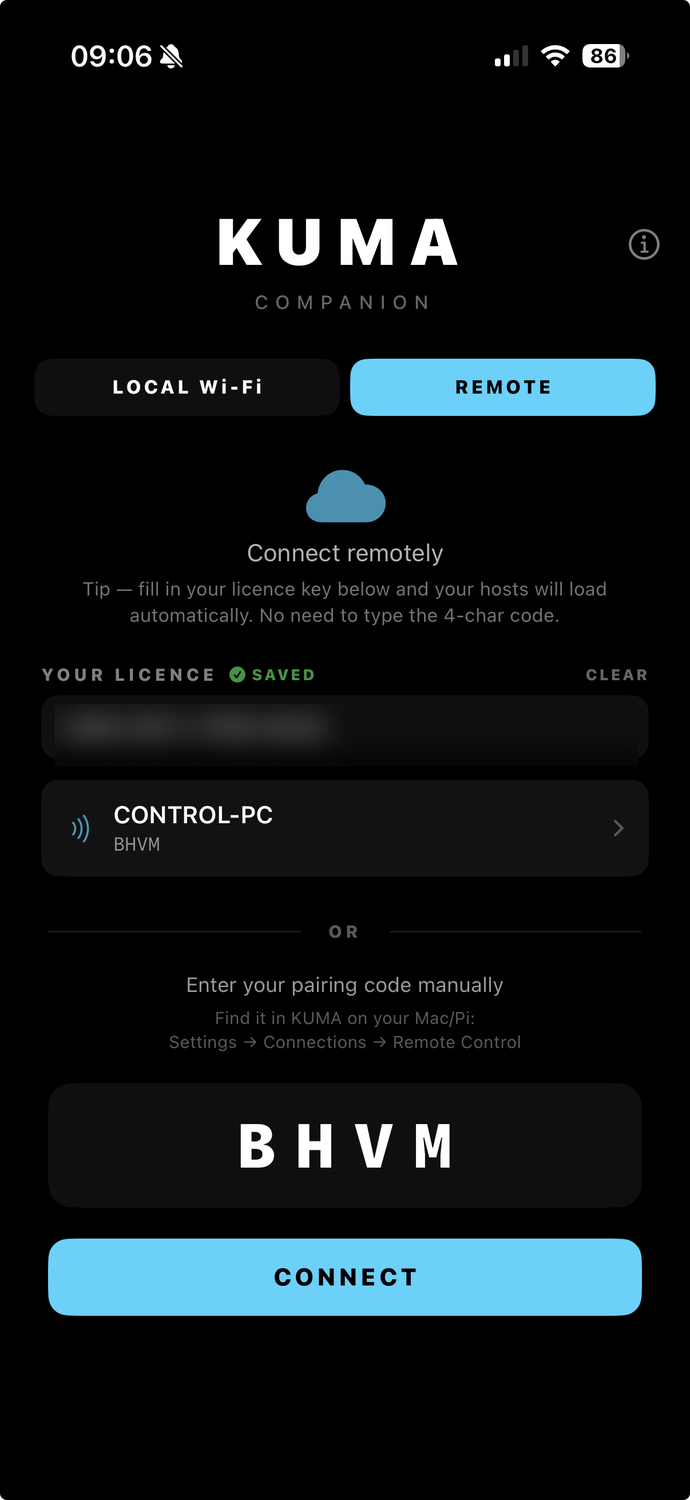
iOS Companion App
KUMA Companion is a free iPhone & iPad app that turns your phone or tablet into a remote control surface for the host. Use it from front-of-house, the green room, the production gallery — anywhere on the same Wi-Fi or, with KUMA Live enabled, anywhere with internet.
Getting it
Available on the App Store — free with every Full licence. Monitor and Controller views, QLab/Mitti TCR, custom layouts.
Pairing modes
- LAN (Bonjour) — open the app, tap the host that appears in the discovery list. Zero configuration, but only works on the same network.
- Manual IP — type the host's IP and port directly. Useful when Bonjour is blocked by the venue's switch (common at large conferences).
- Pairing code (cloud / KUMA Live) — host generates a 4-character code in Settings → Connections → Remote Control. The Show Caller types the code into the app and connects through the relay — no port forwarding, works anywhere with internet. Saving your licence in the app pre-loads the host list automatically next time.
Modes
After connecting, choose one of two views:
- CONTROLLER — full control surface mirroring the host's web admin: START / PAUSE / RESET / HIDE, ±1 minute, count-up, presets row, cuesheet with prev / next / tap-to-load, Send Message, Time cut (Glide / Jump — long-press the button to switch mode), mode toggle (TIMER / CLOCK).
- MONITOR — fullscreen timer with the same colour states as the host display. No controls, designed for the talent or stage manager who needs the same readout the speaker sees.
Note: the iOS Companion Monitor mirrors timer text, colour states, SMS overlays and (in CLOCK mode) the BBC RounDOT face — but always renders on a black background. Custom background images set on the host (Settings → Display → Background type → Image) appear on the host display, web mirror, and NDI output, but not on the iPad. This keeps the Monitor readable at any brightness and avoids streaming wallpaper bytes over the relay.
Stages mode iPad only
Stages turns the iPad into a multi-host control surface — one app, several KUMA hosts, one swipe between them. Built for multi-room conferences, multi-stage festivals, A/B redundant timer setups and any situation where the same operator runs more than one timer at once. iPad only; the iPhone build deliberately keeps a single-host-per-app model.
How it works
- Add a stage — tap +, give it a nickname (e.g. Hall A), enter the host's 4-character pairing code from Settings → Connections → Remote Control, optionally set a colour and a per-stage password. Up to eight stages per device.
- Tap a row to take control of that host. The right pane (or full screen on portrait) becomes the same Controller surface single-host mode uses — START / PAUSE / RESET / cuesheet / presets / Send Message — wired to that specific host. A coloured banner across the top reminds you which stage is active.
- Swipe a row left or right for quick actions: Edit (rename / change password / change colour) or Delete. Long-press and drag to reorder.
- Live mini-status on every row shows the host's current timer state and a transport icon — wifi for direct LAN, cloud for relay — without needing to open each stage.
- LAN auto-promote — when the iPad and a host land on the same Wi-Fi, the Companion discovers the host via Bonjour, fetches its
/api/status, matches the returnedremote_control_codeagainst your stored stages, and quietly upgrades that stage's connection from cloud relay to a direct LAN WebSocket. Latency drops from typical 50-150 ms to sub-20 ms. The transport icon flips from cloud to wifi to confirm. Falls back to cloud automatically if the LAN host disappears (laptop closed, switched networks, etc.). - Connection states per stage: connected, connecting, interrupted (host went silent — kept the last known timer extrapolating locally for ~30 s), lost (gave up, will retry on tap or server-push notification when the host comes back). Operators see exactly which stage is healthy at a glance.
- Per-stage password — if a host requires a password (set in its Settings → Connections), the Companion saves it per-stage so each tap into that row authenticates without re-typing.
Use cases: a single operator at front-of-house running parallel session timers in two breakout rooms; a touring AV tech bringing one iPad to a festival with three KUMA hosts on three stages; a redundancy setup with a primary and standby host on the same network where switching between them is one tap.
iPad in landscape (single stage)
Rotate an iPad to landscape and the Controller switches to a two-column layout: the cuesheet sits permanently on the left, transport and presets fill the right two-thirds. Both columns are tappable simultaneously, so the operator can advance cues while the other hand is on START / PAUSE without swapping screens. Monitor view stays full-screen and simply uses the wider canvas for an even larger countdown.

Features
- Latency chip in the Controller header shows round-trip to the host in milliseconds — green < 30 ms, amber 30-150 ms, red > 150 ms. Most LAN setups stay under 20 ms; cloud relay is typically 50-120 ms depending on geography.
- Live Activity on iPhone Lock Screen and Dynamic Island — countdown stays visible without unlocking the phone.
- Authoritative colour mirroring — when the host display goes orange or red, the Companion timer flips at the same moment using the host's
display_colorfield. - Optimistic action feedback — START / PAUSE / RESET reflect on the iPad instantly, then reconcile with the host's authoritative state on the next status push (~200 ms).
- SMS-style quick messages — tap a saved message preset to send "Wrap up" or "2 minutes left" to the host's on-screen banner.
- Universal Links — tapping a pairing-code QR link from the host's Settings opens the app directly with the code pre-filled.
Requirements
- iPhone or iPad on iOS / iPadOS 17 or newer.
- Same Wi-Fi network as the host for LAN mode, or any internet connection for cloud mode.
- Host running KUMA Timer 1.10.10 or newer for full feature parity (latency chip, authoritative colours, Universal Links). Older hosts work with reduced features.
TCP / UDP Show Control
KUMA Timer can receive plain-text ASCII commands over TCP or UDP — ideal for integration with show control systems that support custom string output: Dataton Watchout, QLab, Cue Pilot, Green Hippo, and similar.
Enable in Settings → Connections → TCP / UDP Show Control. Default listen port: 36702 (TCP + UDP, same port).
Command reference
One command per line, terminated with \r\n or \n. UDP packets may omit the newline. Commands are case-insensitive.
| Command | Example | Action |
|---|---|---|
START | START | Start the timer |
STOP | STOP | Stop / pause |
PAUSE | PAUSE | Alias for STOP |
RESET | RESET | Reset to loaded duration |
HIDE | HIDE | Toggle display visibility |
SET MM:SS | SET 10:00 | Stop timer and load new time |
SET HH:MM:SS | SET 1:30:00 | Stop timer and load new time |
SETRUN MM:SS | SETRUN 5:00 | Update time while timer keeps running |
LOAD <seconds> | LOAD 600 | Load exact number of seconds |
ADD <seconds> | ADD 60 | Add time (+1 min) |
SUB <seconds> | SUB 30 | Remove time (−30 sec) |
PRESET <index> | PRESET 0 | Load preset by 0-based index |
CUE <index> | CUE 2 | Load runsheet cue by 0-based index |
CUE NEXT | CUE NEXT | Advance to next cue |
TCP connections receive a response to each command (OK START, ERR unknown command etc.). UDP is fire-and-forget.
Watchout V6 setup
- In Watchout, open the Output window and add a String Output.
- Set Protocol to TCP (or UDP), IP to your KUMA machine's IP, Port to
36702. - In the Data to Send field, enter the command followed by CR+LF: e.g.
START$0D$0AorSET 10:00$0D$0A. - Place the String Output cue at the point on the Watchout timeline where you want KUMA to react.
Test from Terminal
# TCP
echo -e "START\r" | nc localhost 36702

# UDP (Python — most reliable on macOS)
python3 -c "import socket; s=socket.socket(socket.AF_INET,socket.SOCK_DGRAM); s.sendto(b'START\n', ('127.0.0.1',36702))"
Layout Editor
The Layout Editor lets you design your own clock window instead of using the built-in styles. Open it from Settings → Display → Layout Editor (or the Edit Layout button on the display).
- Drag and resize any element on a 1920×1080 canvas — the timer, time-of-day, cue name, progress bar, on-screen message and the QLab/Mitti TCR line.
- Per-element control: colour, font, size (fixed px or auto-fit), horizontal / vertical alignment and front/back stacking order.
- Save as a preset and recall it by name or slot — including from Bitfocus Companion (Recall Layout Preset, requires module v2.1.x — awaiting Bitfocus review).
- Renders everywhere. One layout drives the host screen, NDI output, the KUMA Live web view and the iOS Companion — fonts, gradient, progress-bar fill direction and pill corners all match the host.
A custom layout takes over from the Text / Round / RounDOT styles while it's active. The per-element Timer size override is greyed out because the layout already positions and sizes the timer.
TCR Follow — QLab / Mitti / Millumin
KUMA mirrors the remaining time of the clip your playback tool is running — the TCR (Time Code Remaining). Pick a single TCR source in Settings → Devices: QLab, Mitti, Millumin, or PowerPoint. The setup below is written for QLab; Mitti and Millumin work the same way.
With QLab 5 KUMA also talks OSC in three directions (you can use any combination):
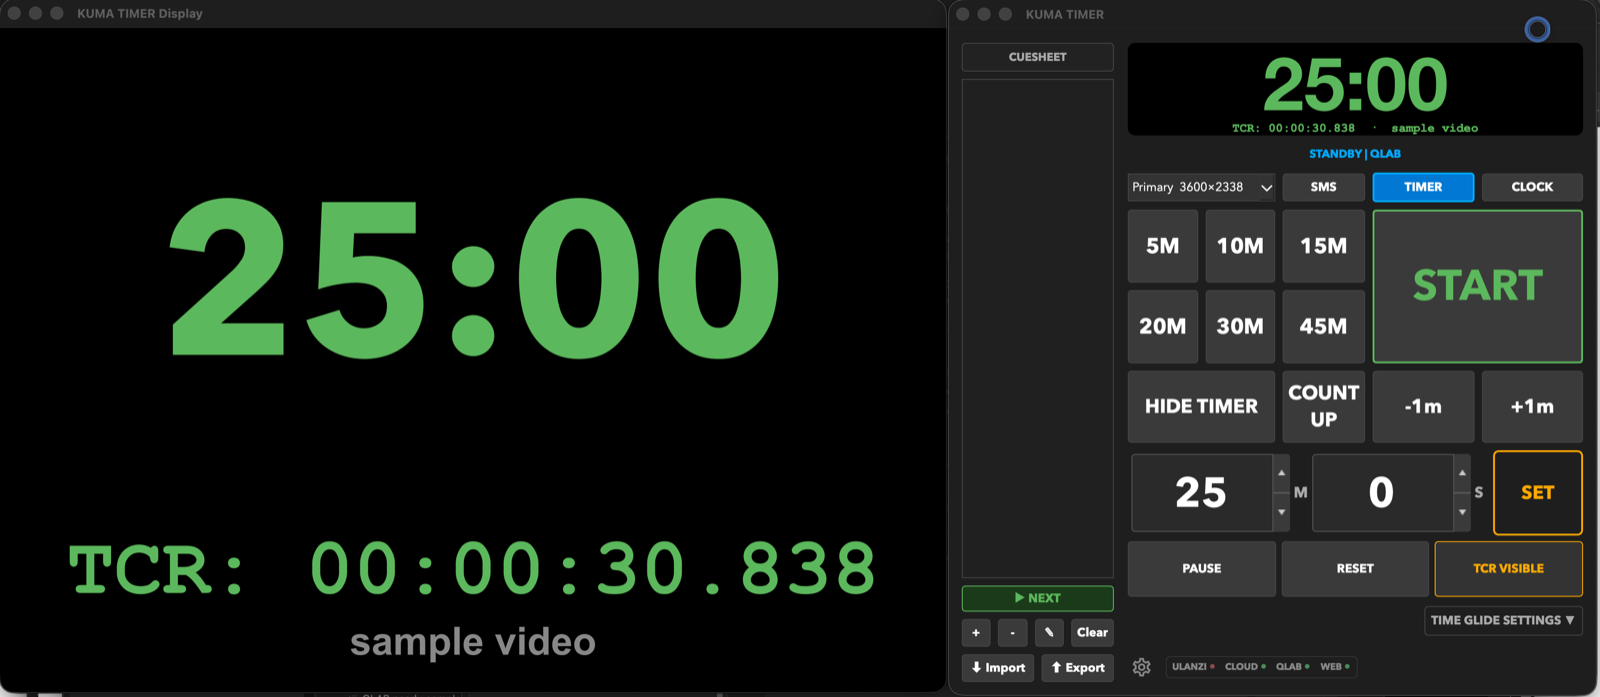
Line mode: your own countdown stays on top, with QLab's running-cue TCR underneath. The TCR VISIBLE / HIDDEN control freezes the audience screen on your timer while you audition a clip.
- QLab → KUMA (commands): a QLab Network cue can START / LOAD / PAUSE KUMA — set up entirely in QLab (see OSC Reference). Always available.
- KUMA → QLab (triggers): KUMA fires OSC to QLab at countdown moments (at a time, on start/pause/resume/stop/overtime, on cue/preset load).
- QLab → KUMA (follow): KUMA mirrors the remaining time of the cue QLab is playing — the TCR (Time Code Remaining).
Enable OSC in QLab (required)
This is the step people miss. In QLab open Settings → OSC Access (not Network Outputs) and:
- Tick Allow OSC connections.
- Note the OSC Listening Port (default
53000). - If you set a passcode, remember it.
QLab replies on a fixed port by default — KUMA automatically tells QLab where to answer (/udpReplyPort), so you don't configure anything else in QLab.
Point KUMA at QLab
In KUMA, Settings → QLab, fill the Target group: IP = QLab's machine (127.0.0.1 if same Mac), Port = QLab's OSC Listening Port (53000), Passcode = the OSC Access passcode (if any). Use Test connection to send a /thump.
Follow QLab playback
Turn on Mirror QLab's running-cue countdown. Two tracking modes:
- Auto-follow running cue — follows whatever Video/Audio cue is playing.
- Specific cue — a comma-separated allow-list (e.g.
5,7,9); KUMA follows whichever listed cue is playing and ignores the rest (handy to skip test cues).
Display: Replace vs Line
| Mode | What you see |
|---|---|
| Replace the timer | QLab's time takes over KUMA's main readout on every output. |
| Line under the timer | KUMA keeps its own timer; the QLab time shows on a second line, e.g. TCR 04:59.123. The chip reads <state> | QLAB. |
Time format for the TCR readout: MM:SS, HH:MM:SS, with :FR (frames) or .mmm (milliseconds, smoothly interpolated). The Line label is free text (default TCR). Each display class has its own follow colour (Main/NDI/web, ESP-S3-BOX, Ulanzi, CDEther / 7-seg).
Loops, chains and groups
- Looping cue → shows
LOOPinstead of a countdown to an end that never comes. - Auto-continue / auto-follow → appends
| FOLLOWSso you know another cue is queued right after. - Several clips at once → a single number is meaningless, so KUMA shows
GROUP PLAYING.
QLAB HOLD (audition-safe)
When follow is enabled, a QLAB HOLD button appears next to PAUSE/RESET. Arm it (TCR HIDDEN, amber) to test/preview a VT in QLab without it taking over the audience screen — KUMA holds its own timer. Release to resume. Also available as a Companion button from module v2.1.x (awaiting Bitfocus review).
What shows where
| Output | Replace mode | Line mode |
|---|---|---|
| Host / NDI / KUMA Live | QLab time | KUMA timer + TCR line |
| ESP32-S3-BOX | QLab time | KUMA timer + TCR line |
| Ulanzi · CDEther / 7-seg · DSAN | QLab time | KUMA timer (no room for a 2nd line) |
| iOS Companion | QLab time | KUMA timer |
The TCR line on NDI / KUMA Live / ESP-S3-BOX needs the host's cloud relay; the ESP-S3-BOX shows it in cloud mode.
Following Mitti instead of QLab
KUMA can follow Mitti playback exactly the way it follows QLab. In Settings → Devices pick a single TCR source — QLab, Mitti, Millumin or PowerPoint — so only one tool drives the TCR line at a time. Everything else (Replace vs Line display, the TCR VISIBLE / HIDDEN hold, time format, per-output colours and what shows where) works the same. Point KUMA at Mitti's IP and OSC port in the same panel.
Following Millumin
Millumin works the same way: set TCR source to Millumin in Settings → Devices. Millumin pushes its playback state to KUMA (there's no request/reply handshake), so there is no IP to enter — just tell Millumin to send OSC to KUMA's IP on the follow port, default 8000. KUMA shows a MILLUMIN label and mirrors the running layer's remaining time.
TCR from PowerPoint — KumaPoint
KumaPoint is a small add-in for PowerPoint on Windows. When a slide with an auto-playing video comes up, it streams that clip's remaining time to KUMA — the same TCR readout you get from QLab or Mitti, but for a VT embedded in a .pptx. Your speaker keeps their deck; you get a countdown to the moment the video ends.
Install
- Download KumaPoint setup (also linked from the sidebar on the home page) and run it. It installs for your user only — no admin rights needed.
- If PowerPoint is open, the installer offers to close it. It can reopen it for you when it finishes.
- Start PowerPoint. You'll have a new KUMA tab in the ribbon.
If the KUMA tab looks empty or missing, check the ribbon isn't collapsed — Ctrl+F1 toggles it.
Sign in
In the ribbon's Licence group type your KUMA licence Code and press Sign in. Signing in does not use up a seat — the add-in is a companion to a machine you already licensed, so on a multi-seat licence you just pick which Seat this presenter PC works alongside. The host then shows that seat next to the PowerPoint chip, so an operator watching several rooms knows which machine is feeding the TCR.
Once signed in, the code is masked in the ribbon (126E-****-****-****) so it isn't readable over someone's shoulder or on a projected screen.
Connect it to KUMA
In the Connection group tick Send TCR to KUMA and pick a Route:
| Route | Use it when | What you set |
|---|---|---|
| Local network | The presenter PC and the KUMA machine are on the same network. | KUMA IP and Port (8010). |
| Cloud relay | They can't see each other — the show machine is on a hard-wired show LAN, the speaker's laptop is on venue Wi-Fi. | Nothing. Pick your KUMA from the KUMA list. |
On cloud relay there is no pairing code to type: you're already signed in, so the add-in lists the KUMA machines currently online under your licence. Press Refresh if one isn't there yet. The host needs Cloud active ticked in Settings → Devices → PowerPoint.
Point KUMA at it
In KUMA: Settings → Devices → TCR source → PowerPoint (KumaPoint). KUMA listens on port 8010. Everything downstream is shared with QLab and Mitti — Replace vs Line display, the TCR hold, time format, per-output colours — so it renders on the host, NDI, KUMA Live, the iOS Companion and the wireless displays exactly as a QLab TCR would.
Check it before the doors open
Diagnostics → Send test pushes a 10-second countdown to KUMA without needing a slide-show. If KUMA counts down from 10, the whole path works. The group also shows the round-trip latency to the relay and a live status line.
What it tracks
KumaPoint reads the video's actual playback position from PowerPoint, so the countdown follows what's really on screen rather than guessing from a clock.
| Case | Tracked? |
|---|---|
| Video auto-plays when its slide comes up | Yes |
| You pause the video | Yes — the readout clears, and returns when you resume. |
| You seek / scrub mid-clip | Yes — the countdown jumps with you. |
| Click-to-play video | Yes — nothing shows until it's actually rolling. |
| You advance slides mid-video | Yes — the readout clears and picks up the next slide's clip. |
| Entrance animation delays the video | Yes — the count starts when the video does, not when the slide appears. |
When a clip ends, or you leave the slide, or the add-in goes quiet, the TCR line clears rather than sitting on 00:00.
Only the first video on a slide is followed — with two clips on one slide a single countdown has no obvious meaning.
Frame-accurate countdown
For broadcast and video production workflows where frames matter (Watchout, QLab, vMix), KUMA Timer can display countdowns with SMPTE-style frame digits.
Enabling
- Open Settings → Display
- Change Clock Format to
MM:SS:FRorHH:MM:SS:FR - Pick your project's Frame Rate: 23.976 / 24 / 25 / 29.97 / 30 / 50 / 60 fps
Direction
Frames count down through each second (at 25 fps: 00:05:00:24 → 00:05:00:23 → … → 00:05:00:00 → 00:04:59:24). The standby display always shows :00 so the set value looks clean before you press START; the moment START is pressed the digit jumps to fps−1 and races toward :00. In Count Up overtime the frame digit behaves the same way, counting down within each elapsed second.
Where frames are shown
- Floating display window / full-screen output — your primary stage feed
- Monitor preview in the control window
- Presenter View Mode floating window
- NDI output — auto-fits the wider 11-character string
- TCP / UDP show control input — Watchout cue lists can send
SET HH:MM:SS:FR; the FR field is accepted but rounded to whole seconds (the engine is second-resolution)
Where frames are NOT shown
Network and small-display surfaces always render HH:MM:SS regardless of the clock format. Wire latency would race the frame digits and the result wouldn't be reliable enough to cue from.
- iOS Companion app
- KUMA Live web viewer
- Bitfocus Companion module
- OSC outputs
- Web admin / browser admin SPA
- Ulanzi TC001 LED matrix & ESP32-S3-BOX wireless displays
- CDEther bridge (3-byte UART protocol)
Limitations
- Round and RounDOT clock styles are not compatible — there's no horizontal room for the extra
:FRsegment. If you switch to a round style while frame mode is active, the picker reverts the format and shows a notice. - CLOCK display mode (Time of Day) renders the system wall clock — frames are not applicable.
- LTC mode uses its own
HH:MM:SS:FFtimecode read from the incoming LTC stream — independent of the frame-rate picker. - Time Glide is disabled while frame mode is active. Glide changes the tick interval which would desync the frame anchor — the system automatically falls back to Time Jump for large enough cuts, otherwise the cut is ignored. Time Jump itself works normally.
- Lite mode is locked to
MM:SS; the frame-accurate formats need a licence or trial.
OSC Reference
OSC is supported for integration with third-party show control systems and lighting desks. For Bitfocus Companion, the dedicated HTTP module (see below) gives richer control and feedback.
Incoming OSC — external device → KUMA
Default listen port: 9000 (Settings → Connections)
| Address | Argument | Action |
|---|---|---|
/kuma/start | — | Start timer |
/kuma/pause | — | Pause / resume toggle |
/kuma/reset | — | Reset to zero |
/kuma/hide | — | Toggle display visibility |
/kuma/time/add | — | +1 minute |
/kuma/time/sub | — | −1 minute |
/kuma/warp | int seconds | Load duration (e.g. 300 = 5:00) |
/kuma/preset | int ≥ 0 | Load preset by index (0 = first). Valid range depends on how many presets you've configured — up to 10 in Lite, unlimited with a licence. |
/kuma/cue | int index | Load cue from runsheet by index |
/kuma/cue/next | — | Advance to next cue |
/kuma/settime | string HH:MM:SS | Load exact time (e.g. "01:30:00") |
/kuma/sms | string text · int duration | Send message to display |
Outgoing OSC — KUMA → external
Default target: 127.0.0.1 : 12321
| Address | Value | Sent when |
|---|---|---|
/kuma/status | "LIVE" · "PAUSED" · "STANDBY" · "HIDDEN" | On state change |
/kuma/overtime | 1 | On overtime start (path configurable) |
Bitfocus Companion Module
The KUMA Timer Companion module communicates over HTTP/JSON — no OSC configuration needed. It polls KUMA's built-in web server for live state and sends commands via HTTP POST.
5555). KUMA and Companion must be on the same network.Installation
- Open the Companion admin page (
http://localhost:8000on the machine running Companion). - Go to Connections, click Add connection and search for KUMA Timer.
- Enter the KUMA host's IP address and port (default
5555), then save.
That's it — the buttons, feedbacks and variables below are now available in the button editor.
.tgz package from the Download page, then in Companion go to Modules → Import module package and select the file before adding the connection.Actions
| Action | Options | Description |
|---|---|---|
| Start | — | Start the timer |
| Pause / Resume | — | Toggle pause state |
| Reset | — | Stop and reset to zero |
| Hide / Show Display | — | Toggle display window visibility |
| +1 Minute | — | Add 60 seconds |
| −1 Minute | — | Subtract 60 seconds |
| Load Time (seconds) | seconds | Load a duration in seconds |
| Load Time (MM:SS) | minutes · seconds | Load duration as MM:SS |
| Load Time (HH:MM:SS) | hours · minutes · seconds | Load duration as HH:MM:SS |
| Adjust Time (+/- MM:SS) | direction · minutes · seconds | Add or subtract any amount in one button (e.g. +2:30) |
| Count Up | — | Start counting up from zero |
| Load Preset | index ≥ 0 | Activate a preset button by index (0 = first). Range depends on how many presets the app has — up to 10 in Lite, unlimited with a licence. |
| Recall Layout Preset | slot or name | Switch the display to a saved Layout Editor preset (module v2.1.x — awaiting Bitfocus review) |
| Load Cue | index | Load runsheet cue by index (0 = first) |
| Next Cue | — | Advance to the next cue in the runsheet |
| Previous Cue | — | Go back to the previous cue in the runsheet |
| Set Display Mode | TIMER · CLOCK | Switch between countdown timer and wall clock |
| Send Message (SMS) | text · duration · colour · border colour · size · position · flash · scroll | Send a styled text message to the display |
| Cancel SMS | — | Remove the current on-screen message |
| QLab: TCR Visible / Hidden | toggle · on · off | Audition hold — freeze the audience screen on your own timer while you preview a clip |
| QLab: Follow On / Off | toggle · on · off | Turn QLab / Mitti follow on or off |
| QLab: Triggers On / Off | toggle · on · off | Turn the KUMA → QLab OSC triggers on or off |
| QLab: Set Followed Cue | cue number / id | Choose which cue to follow when not auto-following |
Feedbacks
| Feedback | Active when |
|---|---|
| Timer is LIVE | Timer is running |
| Timer is PAUSED | Timer is paused |
| Timer in STANDBY | Timer is stopped / reset |
| Display is HIDDEN | Display window is hidden |
| Timer in OVERTIME | Timer has passed zero |
| Cue is active (by index) | The specified cue index is currently loaded |
| Low time warning | Progress percentage is below a set threshold (e.g. <20%) |
| SMS message active | A message is currently shown on screen |
Variables
| Variable | Value |
|---|---|
$(pltech-kumatimer:timer) | Live countdown string, e.g. 04:32 |
$(pltech-kumatimer:timer_seconds) | Timer value in seconds |
$(pltech-kumatimer:status) | LIVE · PAUSED · STANDBY · HIDDEN · OFFLINE |
$(pltech-kumatimer:display_mode) | TIMER or CLOCK |
$(pltech-kumatimer:cue_name) | Name of the currently loaded speaker / cue |
$(pltech-kumatimer:cue_index) | Index of the current cue (−1 if none) |
$(pltech-kumatimer:overtime) | true / false |
$(pltech-kumatimer:progress) | Progress bar percentage (100 → 0) |
$(pltech-kumatimer:sms_active) | true while a message is on screen |
Settings Reference
Display
- Clock format: MM:SS or HH:MM:SS
- Timer Font — Courier New, Menlo, Monaco, Consolas; applies to display window and NDI output
- Timer Style — Text (digits + progress bar), Round (circular ring) or RounDOT (BBC-pip clock face, clock mode only). Or build your own with the Layout Editor.
- Background — choose Solid Color or Image (JPEG/PNG/GIF, max 5 MB); image fills the display window without preserving aspect ratio. Background image is available in both Text and Round styles. Presenter View always uses a solid colour.
- Text colour
- Progress bar and colour warnings (orange at N min, red at N min)
- Show/hide sidebar (runsheet)
- Show cue name above the timer on the display window
- Enable Presenter View Mode
Misc
- Touch keyboard — shows on-screen numeric keyboard next to time input fields (for touch screens)
- Time of Day Timezone — IANA timezone name used in Time of Day (Clock) mode, e.g.
Europe/Warsaw,US/Eastern,Asia/Tokyo. Leave blank to use the system timezone.
Connections
- Web Mirror / Companion API — enable and set port (default 5555); Companion polls
/api/statusand posts to/api/command - Web Controller Password — set a password to enable the browser control panel at
IP:PORT/control; leave blank to disable - NDI Output — enable to broadcast a 1920×1080 NDI stream; one-time licence acceptance required on first use
- OSC — enable for external show control devices; set listen port (default 9000) and feedback target IP:port
SMS
- Default text colour, border colour, size, position for all messages
- Invert scroll direction (for Arabic / Hebrew right-to-left text)
- Saved messages list — always available in the Send Message dialogue
- Clear Recent — removes the automatic last-10 message history
External Devices
-
Interspace Ind (CDEther)
Standard setup — use a router with DHCP. The CDEther ships in DHCP mode from the factory; just plug it into the same router as your laptop and enable the integration in KUMA. KUMA broadcasts UDP frames on the network and every CDEther on the same LAN picks them up. No IP discovery, no pairing, no NIC selection — it just works.
This is how the device is designed to operate per the Interspace manual. Stick with this unless you have no network infrastructure available.
Direct-Attach Mode (advanced fallback). If you're at a small venue with just a laptop and the CDEther on one Ethernet cable — no router, no switch — KUMA can host a tiny built-in DHCP server so the CDEther still gets an IP. Settings → Connections → CDEther → Direct-Attach Mode → Enable.
Important things to know:- ~30 s for the first lease. After enabling Direct-Attach Mode, allow the CDEther 20–30 seconds to issue its DHCP request and receive an IP. The status indicator goes from yellow ("waiting") to green ("CDEther online") once the handshake completes. If you power-cycle the CDEther mid-session, expect a similar wait before it shows online again.
- Requires admin / UAC password to reconfigure the Ethernet adapter; reverts automatically when you Disable or quit KUMA.
- Single CDEther per session. Multiple CDEthers in the same show require a real router — the built-in server hands out only one lease.
- The chosen Ethernet adapter loses internet access while Direct-Attach is active. Use a USB-Ethernet adapter dedicated to the CDEther if your laptop also needs LAN access for other things.
-
Dsan Limitimer — enable and select the RS-485 serial port (USB adapter supported);
KUMA sends a 55-byte DSAN PCT-2 packet at 19 200 baud every 250 ms with countdown time, run/pause state and overtime blink flag.
Driver requirement: The Limitimer USB adapter uses an FTDI chip. If the serial port does not appear in the list, you need to install the FTDI VCP driver first — download it from ftdichip.com/drivers/vcp-drivers (check the chip model printed on your adapter — most common are FT232R or FT231X). - Quick-Entry Keyboard (Pi kiosk only) — pick a USB or Bluetooth keypad here to use as a dedicated remote for time entry and transport. The complete key map and entry rules are documented in the Pi installation section's "Quick-Entry Keyboard" sub-heading.
Overtime
- Behaviour (count up / freeze / stop), message, background colour, blink, OSC trigger path
LTC
- Enable LTC receiver mode and select an audio input device
- Select output screen for the LTC timecode display
- Note: LTC mode disables the cue list — cue names are not shown during LTC playback
Tips & Shortcuts
Keyboard shortcuts (host, v1.12.x)
Global shortcuts — work regardless of which widget has focus, including while typing in the H/M/S time fields:
| Key | Action |
|---|---|
| Space | Start · Pause · Resume the timer |
| R | Reset timer (Ctrl+R is reserved and excluded) |
| H | Hide / show display window |
| S | Jump focus to the first time-input field (M for MM:SS, H for HH:MM:SS) and select its value — type the new value immediately |
Manual time-entry workflow
- Press S — focus lands on M (or H), value pre-selected
- Type the minutes — auto-replaces the highlighted value
- Press Tab — focus jumps to seconds, value pre-selected
- Type the seconds
- (Tab again to reach SET if you want explicit confirmation; otherwise the auto-update fires on each keystroke)
- Press Space — timer starts
Click on a time field also selects its value, so you can mix mouse + keyboard freely.
General tips
- Double-click a cue to instantly load a speaker — no typing needed
- Hold a preset button to change its value without opening Settings
- HIDE TIMER keeps the timer running internally — useful during breaks
- Time cuts (Glide / Jump) are transparent to the audience — Glide accelerates seconds smoothly, Jump hides 10–30 s skips on round boundaries with the last 3 min clean
- OSC feedback (
/kuma/status) lets Companion buttons reflect the real timer state with no polling — and now publishesOVERTIMEas a distinct status when the timer crosses 00:00 - On Windows, if the title bar is hidden behind the taskbar: right-click the taskbar icon → Move, then use the arrow keys